How to Create Realistic Garment Try-On Images with AI?
Learn how to use Style3D Virtual Garment Try-On to turn flat garment photos into model-wearing images. This guide walks through the whole workflow.

Introduction: What is Virtual Garment Try-On?
Getting a garment from a flat product photo onto a model usually means booking talent, organizing a fitting, running a photoshoot, and retouching every image. For small brands and large catalogs alike, that workflow is slow, expensive, and hard to scale — especially when you need multiple angles, poses, or model types for the same piece.
Virtual Garment Try-On changes that starting point. You upload a garment photo, pick an AI model and a model input method, and Style3D AI generates a realistic model-wearing preview in seconds. The garment keeps its original shape, color, and drape while the AI handles the body fit, pose, lighting, and background. Whether you need a quick batch preview or a campaign-ready hero image, the try-on process starts the moment you upload the garment.
Quick Start Guide
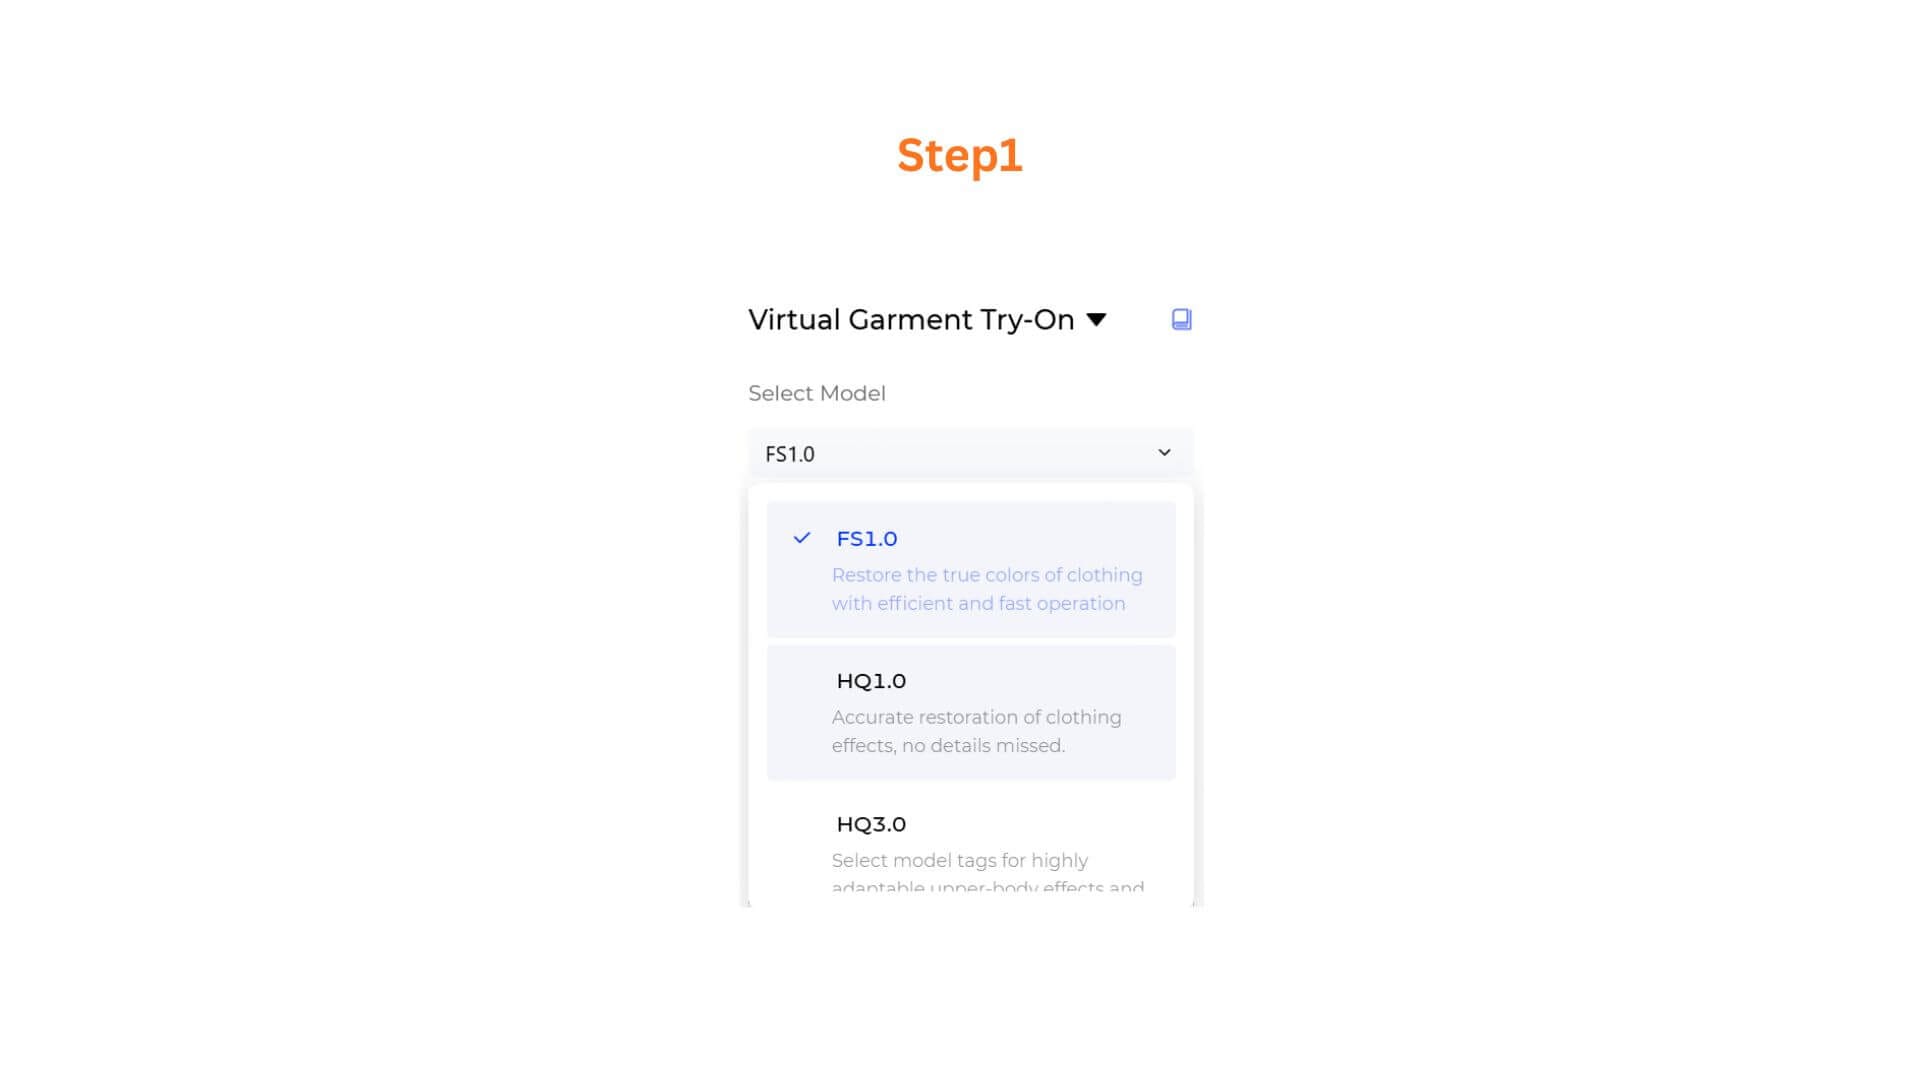
Step 1: Select Your AI Model
Open the Select Model dropdown and choose:
- FS1.0 — Best for quick previews and bulk workflows.
- HQ1.0 — Best for color fidelity and fine details.
- HQ3.0 — Best for campaign-ready images.
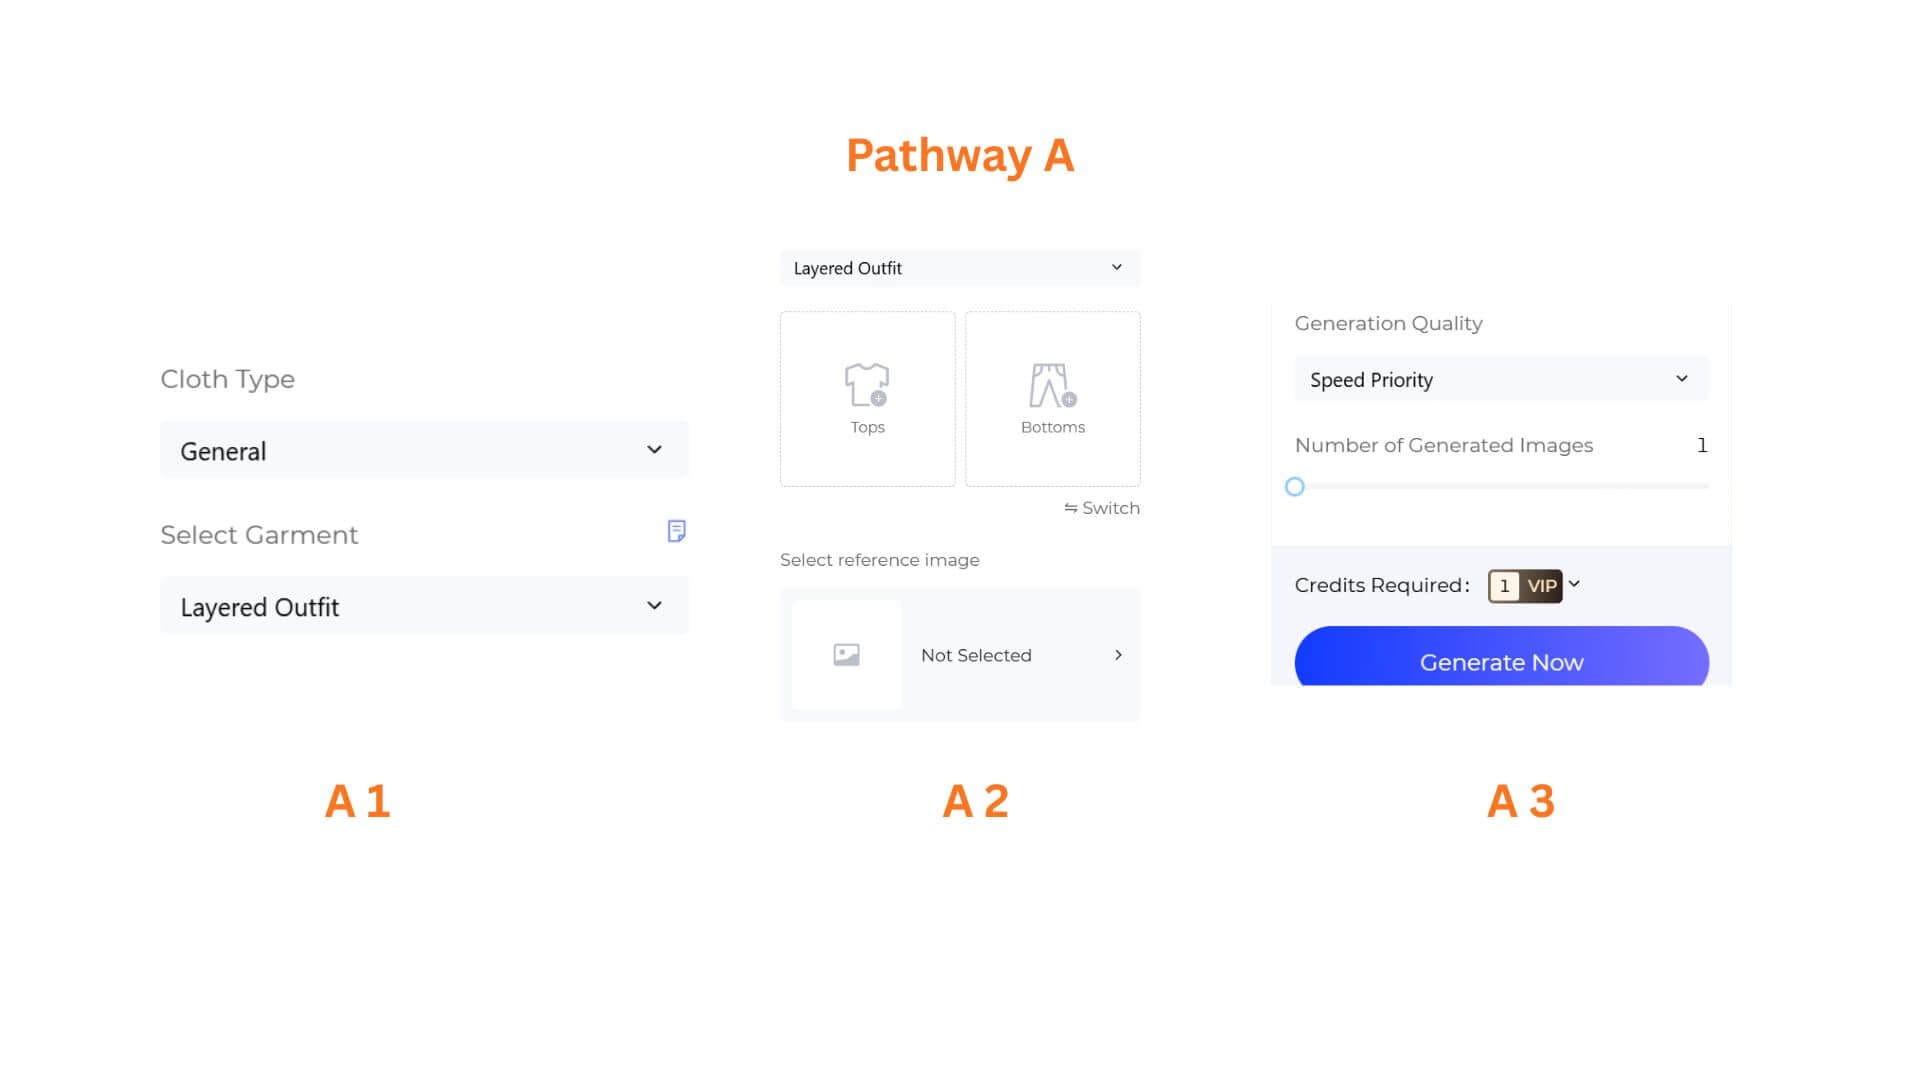
Pathway A — FS1.0
A1: Set Cloth Type and Garment Type
Cloth Type — Only FS1.0 shows this:
- General — standard clothing.
- Underwear — lingerie, swimwear, and close-fitting garments.
Select Garment — Choose the garment type:
- Layered Outfit — top + bottom; two upload boxes + Switch button appear.
- One-piece Garment — dresses, jumpsuits.
- Tops — shirts, jackets, sweaters.
- Bottoms — pants, skirts, shorts.
A2: Upload Garment and Reference Image
Upload your garment photo. For Layered Outfit, upload into Tops and Bottoms separately and use Switch to swap positions.
Then add a Select reference image (model photo) if you want the AI to match a specific body shape.
Accepted formats: Supported Style Image formats: JPG、JPEG、PNG、WEBP、AVIF,Size range: 5 KB - 5 MB,Dimension range 150x150px - 4096x4096px
Avoid folded/occluded garments, multiple garments, or non-front-view shots.
A3: Configure Settings and Generate
- Select Model (Optional) — pick a model photo or library model.
- Generation Quality — Speed Priority or Quality Priority.
- Number of Generated Images — set the batch size.
- Click Generate Now.
Pathway B — HQ1.0
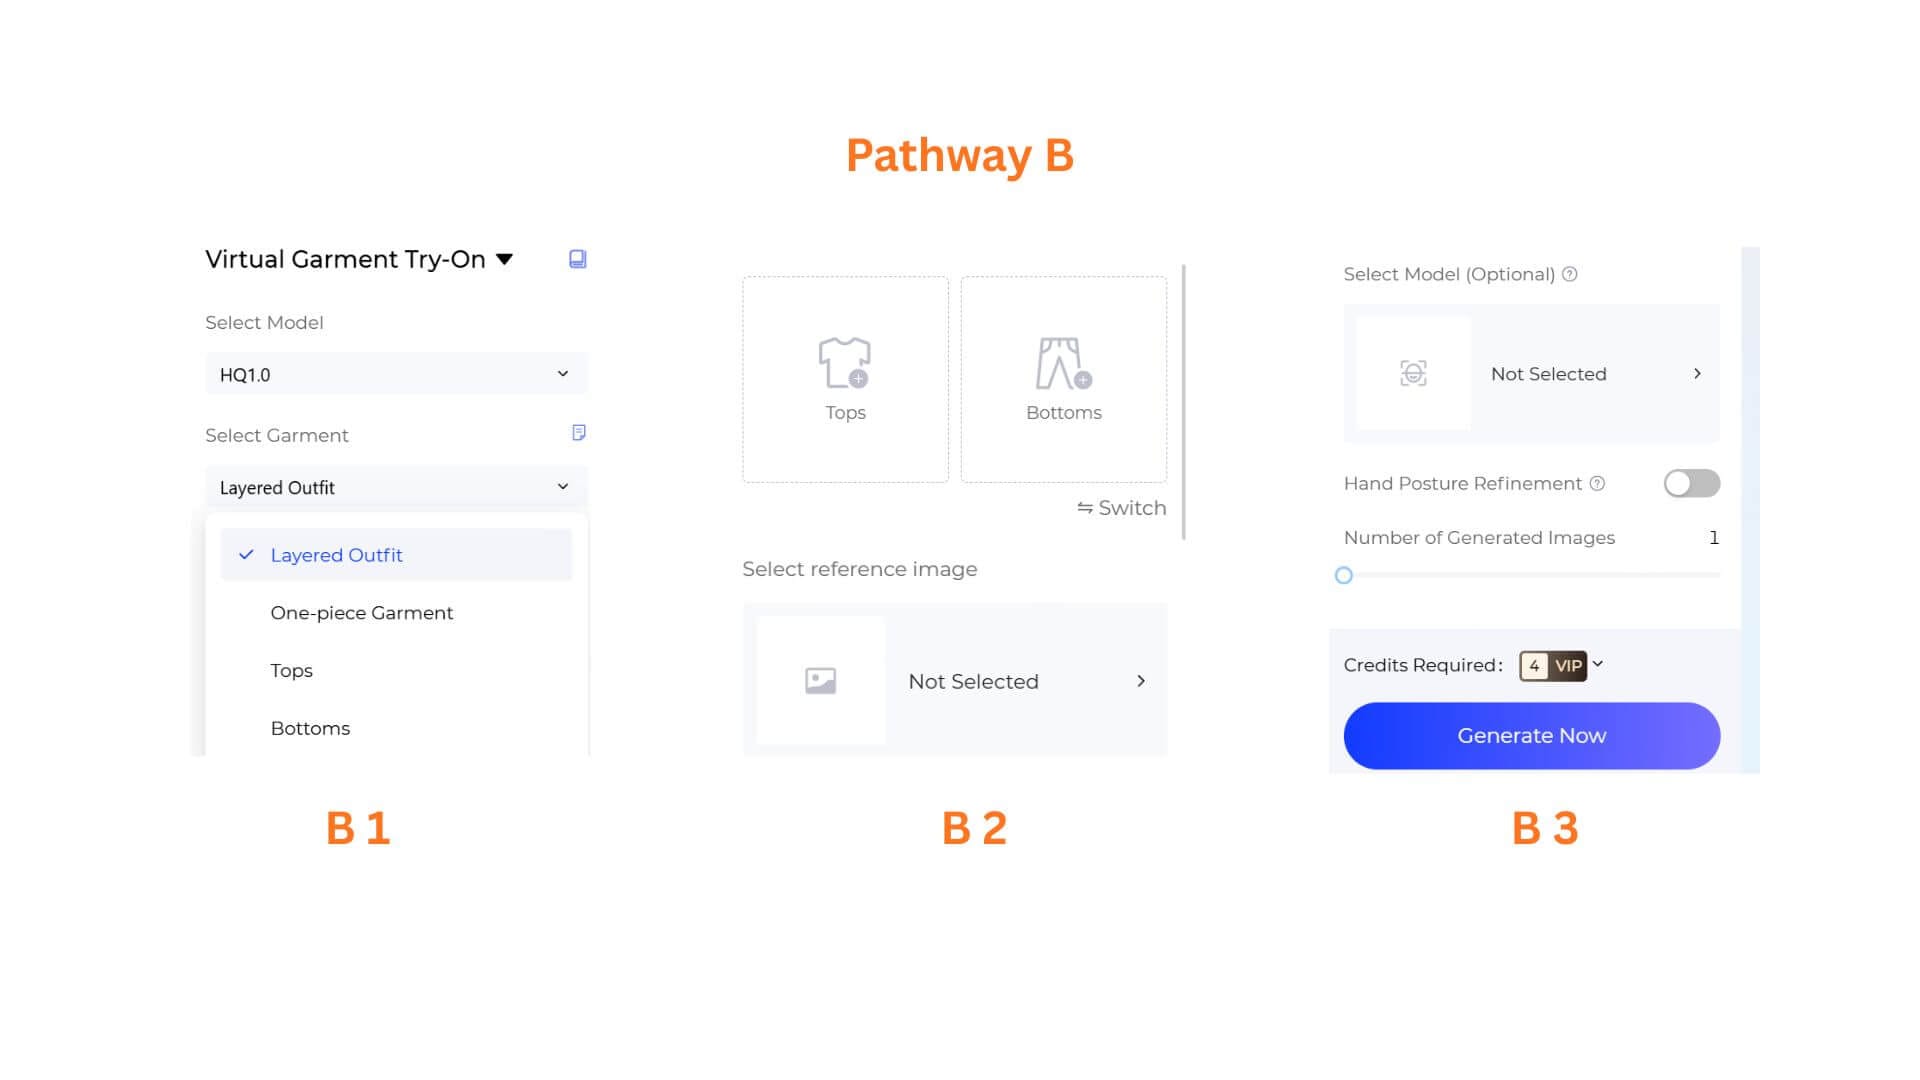
B1: Select Garment Type
Select Garment — Same options as FS1.0.
B2: Upload Garment and Reference Image
Upload garment photo(s) into Tops / Bottoms (Layered Outfit) or the single upload area. Then add a Select reference image.
B3: Configure Settings and Generate
- Select Model (Optional) — pick a model photo or library model.
- Hand Posture Refinement — Toggle ON for more natural hand positioning (recommended for close-ups and sleeveless garments).
- Number of Generated Images — set the batch size.
- Click Generate Now.
Pathway C — HQ3.0
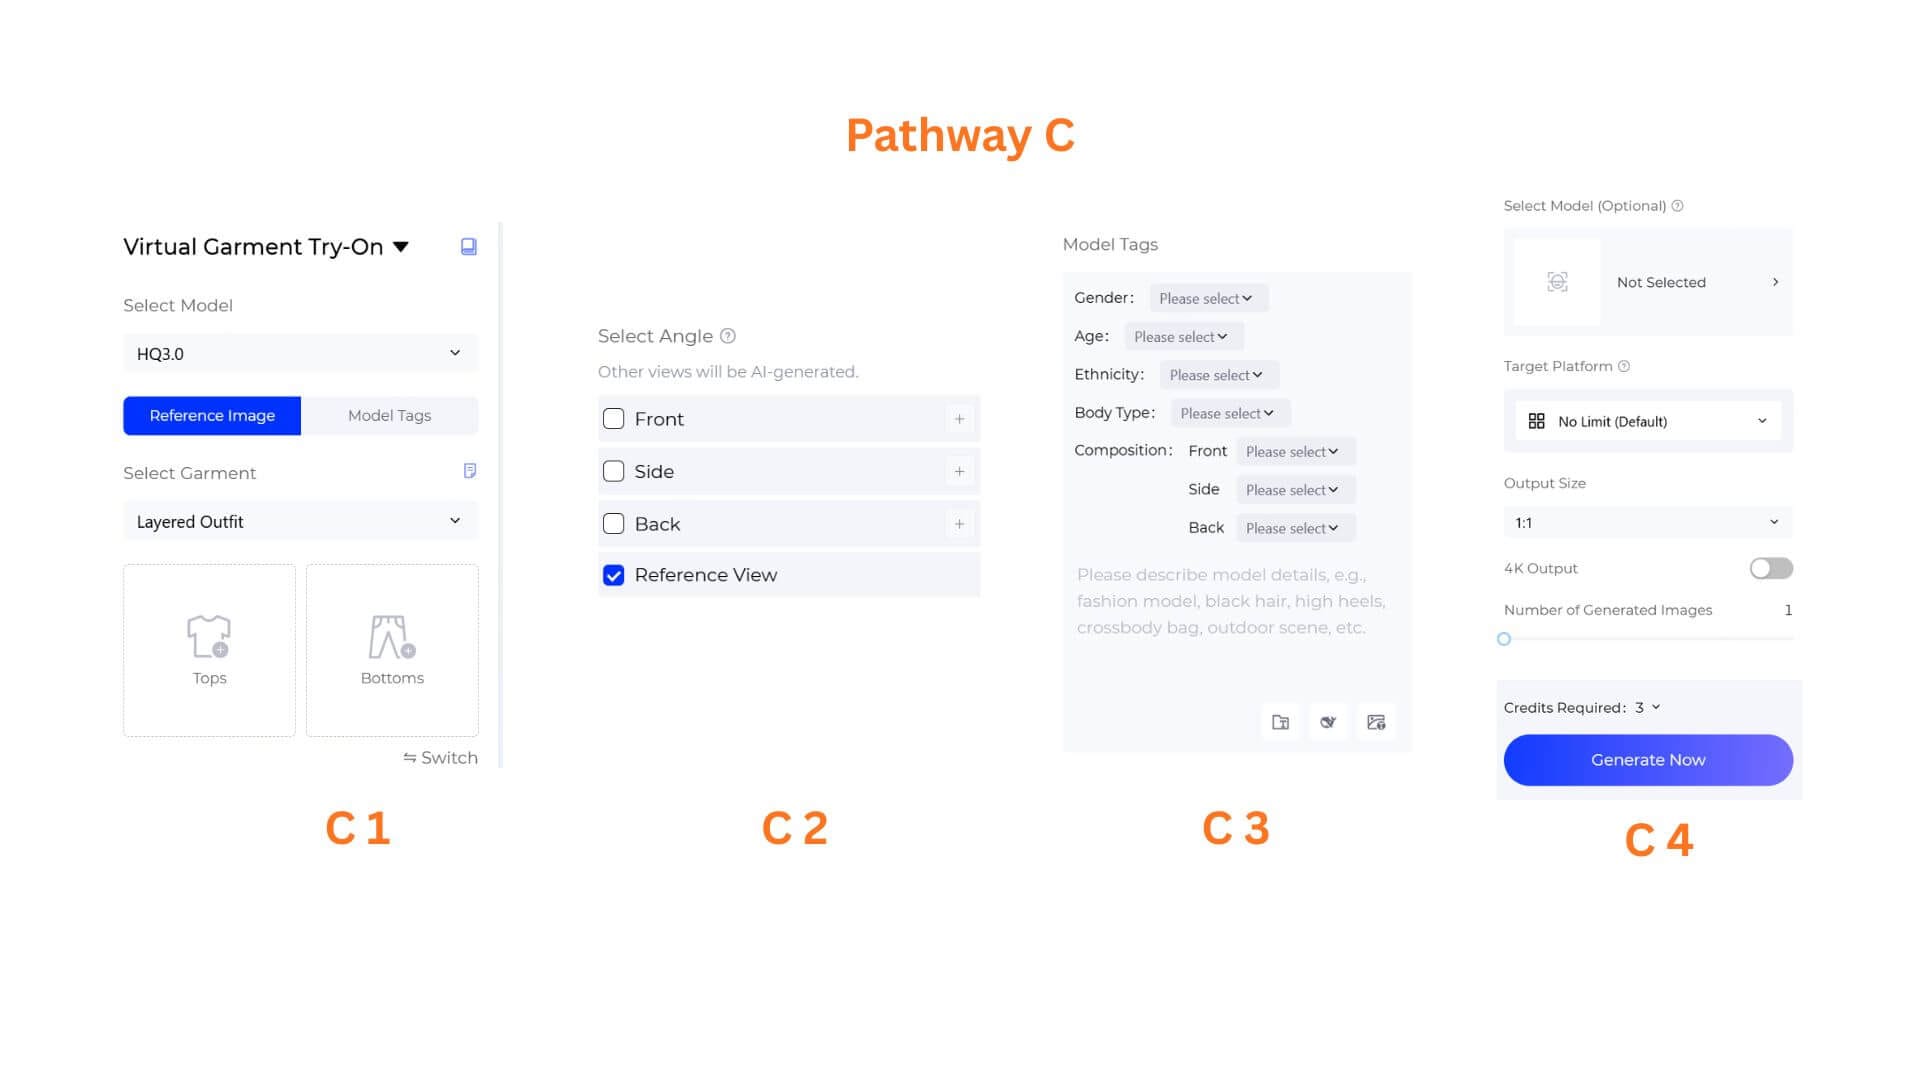
C1: Select Garment Type and Upload
Select Garment — Same options as other models.
Upload garment photo(s) into Tops / Bottoms (Layered Outfit) or the single upload area.
C2: Choose View Angles
Select Angle — Only HQ3.0 has this control:
- Front — standard frontal view
- Side — left or right profile
- Back — rear view
- Reference View — preserves the original pose from your reference image
C3: Choose Input Mode
HQ3.0 has two tabs. Both share the same garment, angle, and output settings — only the model input differs.
Reference Image tab — Upload a model photo in Select reference image. The AI matches that person's body shape and proportions.
- Style Description (Optional) — prompt for the corresponding style.
Model Tags tab — Build a model through tags:
- Gender / Age / Ethnicity / Body Type
- Composition — pose angle for each view: Front / Side / Back
- Text Description — e.g., "fashion model, black hair, high heels, outdoor scene"
C4: Configure Output Settings and Generate
- Select Model (Optional) — pick a model photo or library model.
- Target Platform (Model Tags only) — No Limit (Default) / Amazon / Shopify / TikTok / Instagram.
- Output Size — default is Original.
- 4K Output — toggle ON for ultra-high-resolution images.
- Number of Generated Images — set the batch size.
- Click Generate Now.
Pro-Tips
- FS1.0 for bulk workflows — 1 VIP per image makes it the cheapest way to generate dozens of quick previews. Switch to HQ1.0 or HQ3.0 for final campaign assets.
- Layered Outfit + Switch — Upload both top and bottom, then use Switch to swap their order without re-uploading.
- HQ3.0 Model Tags for precise casting — Pair Gender / Age / Ethnicity / Body Type with Target Platform to auto-optimize composition for Amazon, Shopify, TikTok, or Instagram.
- 4K Output for hero images — Toggle 4K ON in HQ3.0 for lookbooks and large-format ads. Use standard resolution for routine listings.
- Hand Posture Refinement for close-ups — Enable HQ1.0's hand refinement when the garment has sleeveless or three-quarter sleeves; skip it for full-body shots with arms at sides.
- Combine with other AI Photoshoot tools — After try-on, use Change Model & BG or Change Pose to create variations without re-uploading.
Frequently Asked Questions
Q: What is the difference between the three AI models?
A: FS1.0 is fast and cost-effective, with a Cloth Type option for underwear. HQ1.0 delivers higher-fidelity try-ons with optional Hand Posture Refinement. HQ3.0 offers the most control — Reference Image / Model Tags tabs, Select Angle, 4K output, and Target Platform.
Q: Can I try on a layered outfit (top + bottom together)?
A: Yes. Select Layered Outfit. Two upload areas appear for Tops and Bottoms, and you can swap them with Switch. For single items, choose Tops, Bottoms, or One-piece Garment.
Q: Can I generate underwear and lingerie try-ons?
A: Yes — select FS1.0 and set Cloth Type to Underwear. HQ1.0 and HQ3.0 do not have a Cloth Type option and use general fitting only.
Q: What's the difference between Reference Image and Model Tags in HQ3.0?
A: Reference Image uploads a real person's photo and matches their body shape. Model Tags builds a model from demographic tags and text descriptions. Both modes share the same garment, angle, and output settings.
Written by
What's Next?