How to Turn Fashion Images into Short Videos with AI?
Turn static fashion photos into dynamic videos with Style3D AI. Generate videos with AI dubbing.This guide covers the complete workflow and expert tips.

Introduction: What's Image To Video?
Static product images are essential, but they don't always capture how a garment moves, drapes, and comes to life. Video content drives 80% higher engagement on e-commerce platforms, yet creating professional fashion videos traditionally requires models, studios, and post-production.
Image To Video solves this by turning a single fashion photo (or a pair of start/end frames) into a dynamic short video clip in seconds — with or without a multi-shot storyboard. Whether you need a model walking in a dress, a garment rotating to show different angles, a smooth transition between two poses, or a full editorial-style sequence with multiple scenes.
Quick Start Guide
Step 1: Upload Your Image
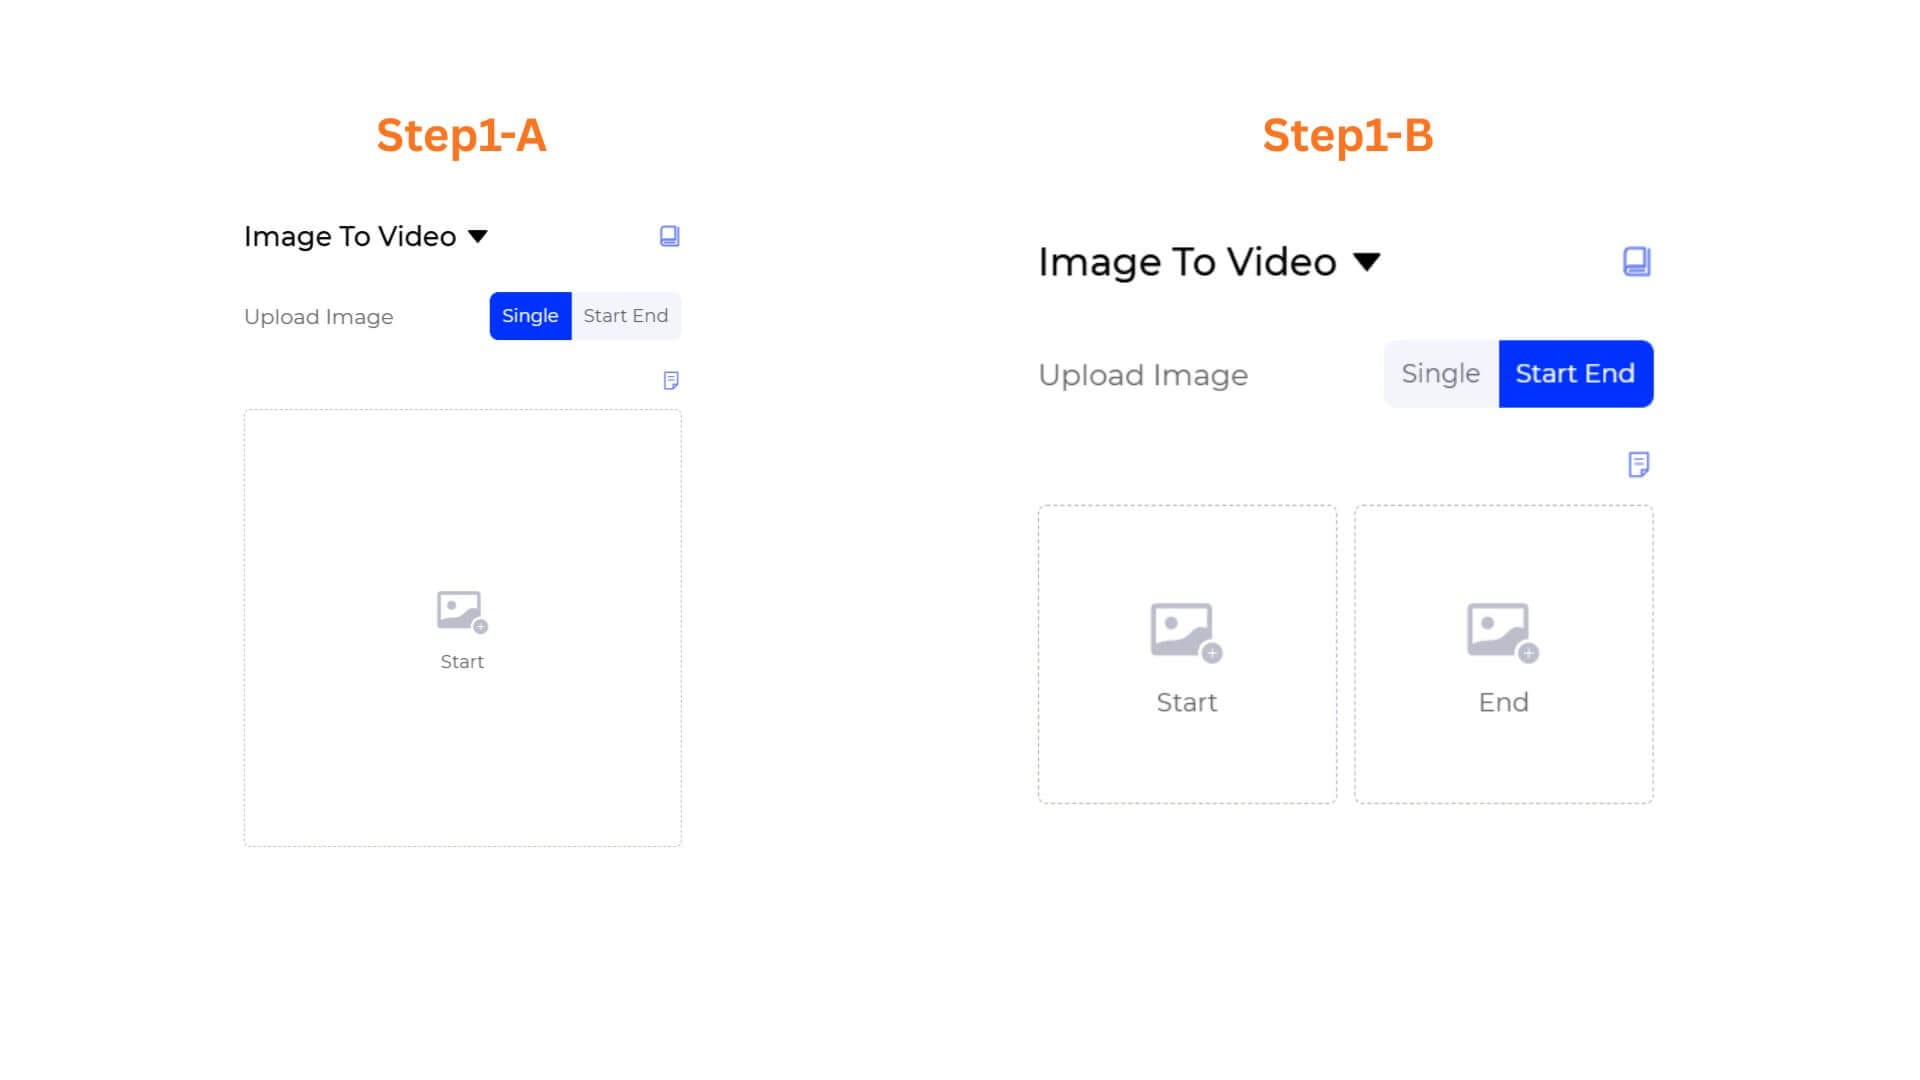
Choose your upload mode:
Option A — Single Image
- Select the Single tab.
- Drag and drop or click the Start upload area to add one image.
Option B — Start & End
- Select the Start End tab.
- Upload two images: one for the Start frame and one for the End frame.
- The AI will generate a smooth transition video between the two.
Image Requirements
- Supported formats: JPG, JPEG, PNG, WEBP, AVIF.
- File size must be under 10 MB.
- Minimum image width and height: 300 px.
- Image ratio between 0.4 – 2.5.
Step 2: Describe the video you want
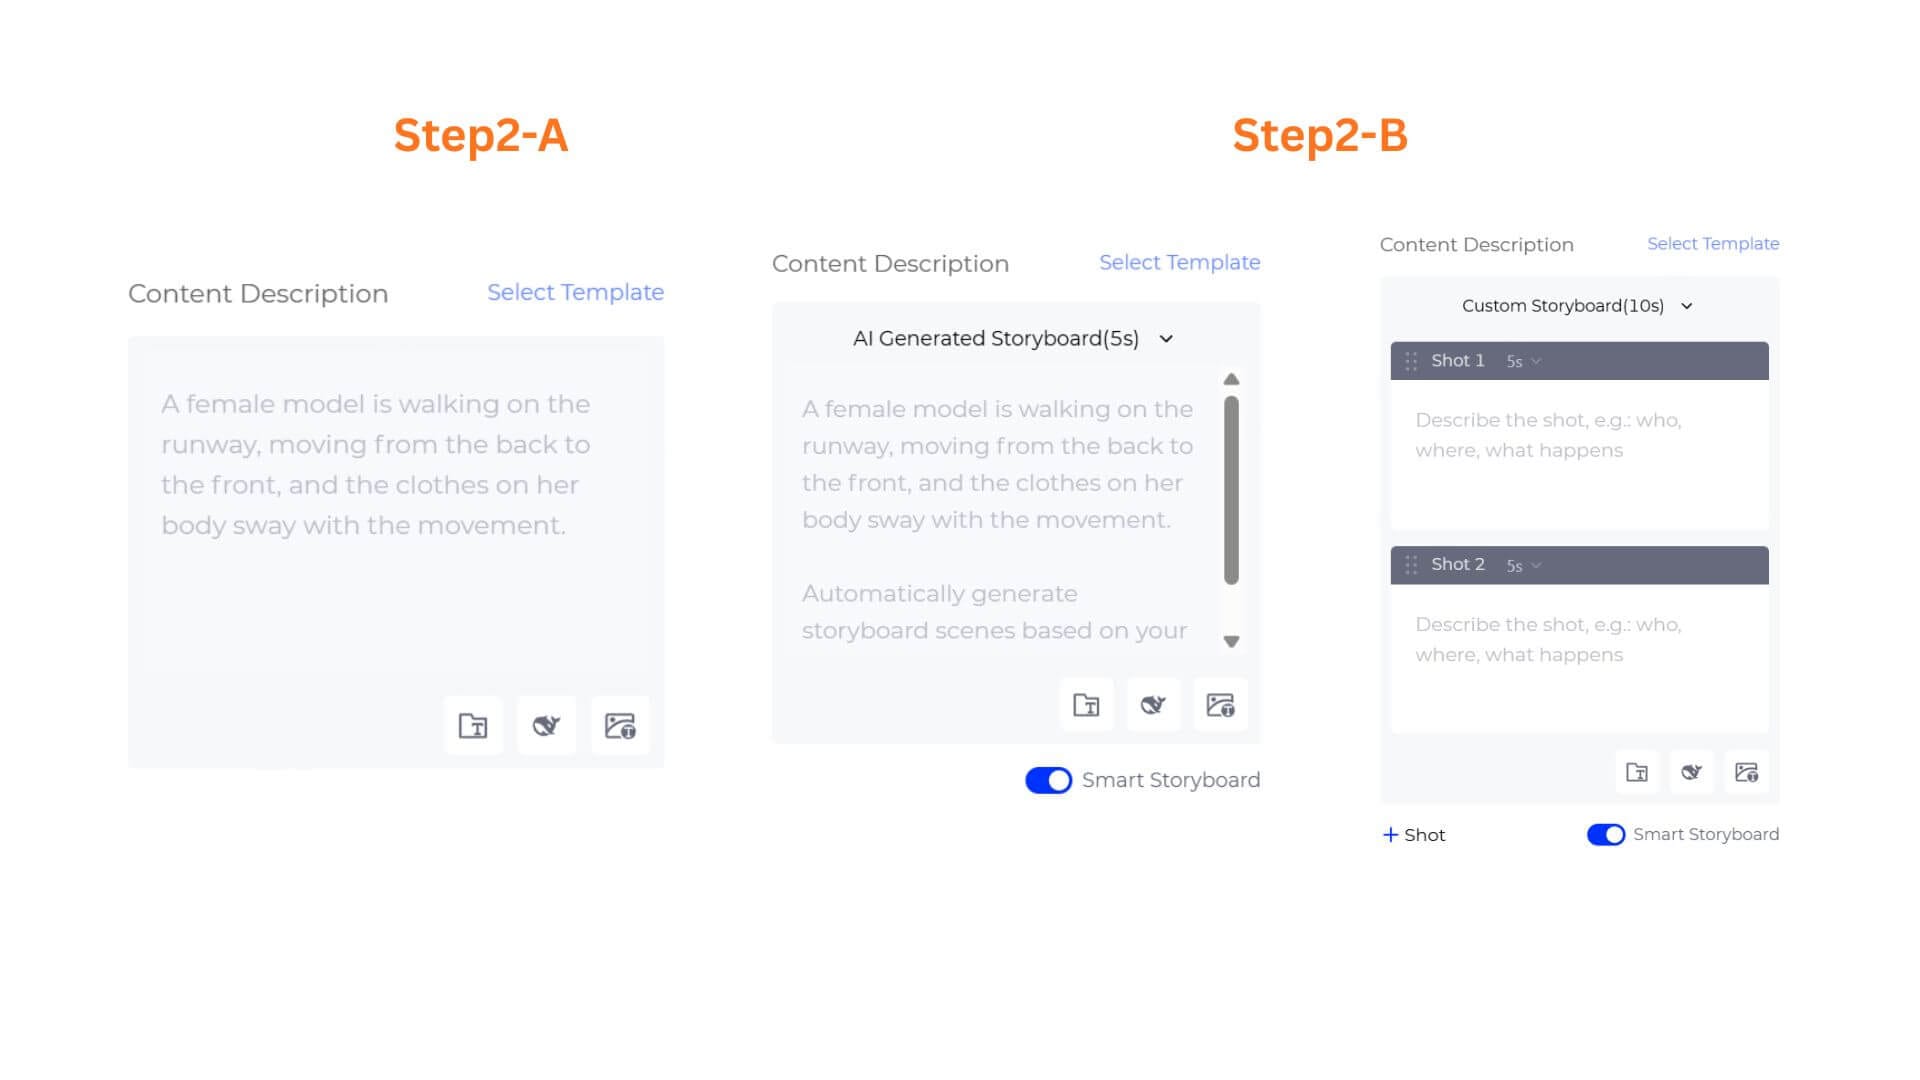
Select Template — Click the link in the top-right corner of the Content Description area to browse saved prompt templates.
Pathway A — Single Mode (Smart Storyboard OFF) or Start End Mode
Enter a text description in the Content Description field describing the motion you want the model or garment to perform. Example:
"A female model is walking on the runway, moving from the back to the front, and the clothes on her body sway with the movement."
- Select Template — Click the link in the top-right corner of the Content Description area to browse saved prompt templates.
Pathway B — Single Mode(Smart Storyboard ON)
Toggle Smart Storyboard ON. The Content Description area expands to support storyboard planning, with two modes available from the dropdown:
- Custom Storyboard — Switch to this mode to manually plan each shot. You get:
- Up to 6 shots per video
- Each shot has its own description field with the placeholder: "Describe the shot, e.g.: who, where, what happens"
- A duration dropdown per shot (e.g., 5s)
- A + Shot button to add more scenes
AI Generated Storyboard (default) — Enter a single description and the AI automatically splits it into scenes with camera movements and transitions.
Three helper tools sit at the bottom of the text field:
- Prompt Manager — Opens a side panel to search, manage, or add custom prompt templates saved to your workspace. Reuse your best-performing prompts across sessions.
- Opt Prompt — Instantly expands a simple idea into a professional, highly descriptive prompt. Type a rough direction (e.g., "tropical floral") and let the AI flesh out the detail.
- Rev Prompt — Upload an inspiration or trend reference photo, and the AI reverse-engineers it into a text prompt automatically filled into your input box. Great for translating a mood board image into words.
Step 3: Configure Video Settings
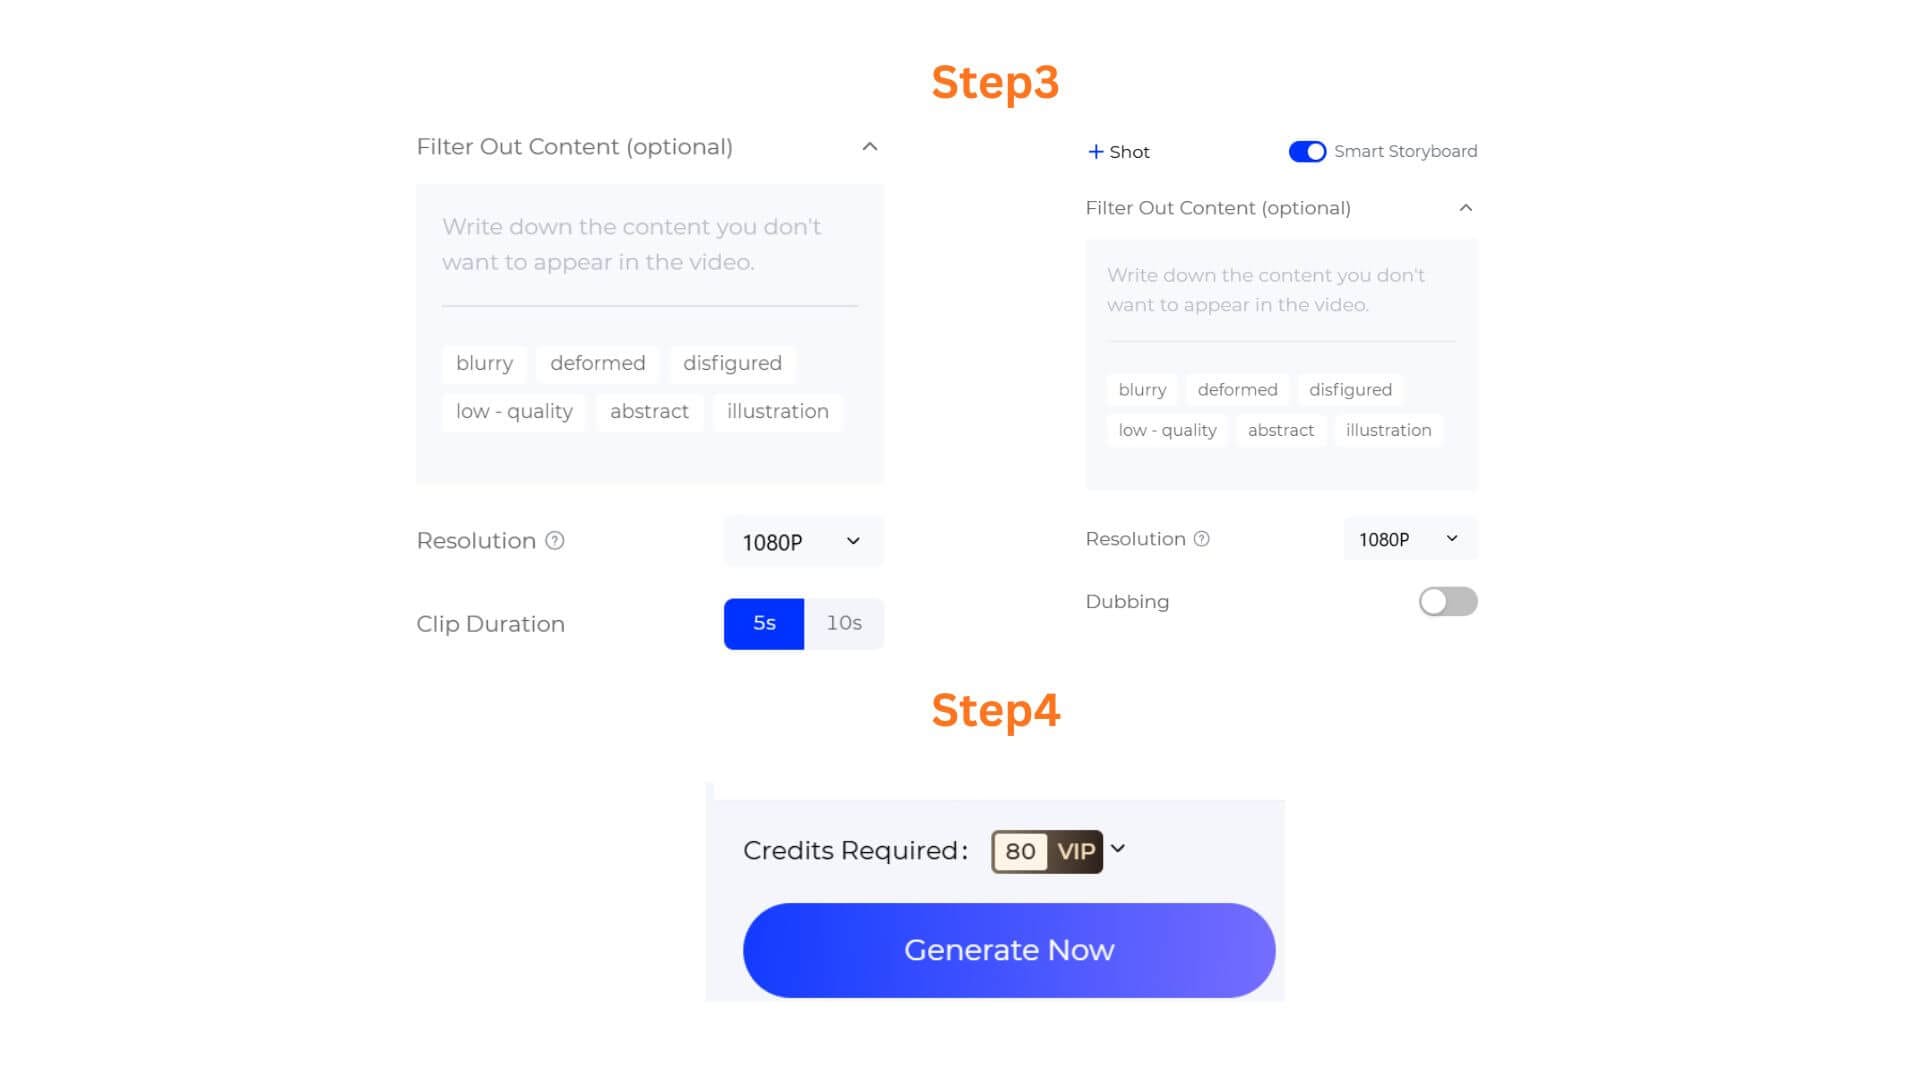
Filter Out Content (optional)
- Click the Filter Out Content (optional) dropdown to exclude unwanted elements from the generated video (e.g., text, logos, or specific objects).
Resolution
Select your output resolution from the dropdown. Default is 1080P.
Clip Duration
Choose between 5s and 10s for the total video length.
Dubbing (Smart Storyboard mode only)
When Smart Storyboard is ON, a Dubbing toggle appears below the Resolution dropdown. Toggle it ON to add AI-generated voiceover to your video. Default is OFF.
Step 4: Review Credits and Generate
- Click Generate Now to start the generation.
- Adjust your description or settings and regenerate as needed.
Pro-Tips
Keep your descriptions specific but concise. Phrases like "model sways gently" work better than "make it look nice." Specificity guides the AI without over-constraining creativity.
Use AI Generated Storyboard for quick campaign cuts. When you have a clear motion idea but don't want to manually storyboard every frame, let the AI Generated Storyboard split your description into scenes automatically.
Use Custom Storyboard for precise creative control. When you need exact shot sequencing — e.g., a close-up of fabric detail, then a full-body walk, then a turn — manually plan up to 6 shots with Custom Storyboard for full editorial control.
Enable Dubbing for social-ready content. In Smart Storyboard mode, adding AI dubbing turns your product video into a complete marketing asset with voiceover, ready for TikTok, Instagram Reels, or e-commerce listings.
Frequently Asked Questions
Q: Can I upload a sketch or illustration instead of a photo?
A: Image To Video works best with high-quality photographs of real garments on models or mannequins. Sketches and illustrations may produce less predictable motion since the AI relies on fabric physics and body structure.
Q: Can I generate videos longer than 10 seconds?
A: Currently, the maximum clip duration is 10 seconds per video (or per shot in Custom Storyboard mode). For longer content, we recommend generating multiple clips and stitching them together in external video editing software.
Q: How many shots can I add in Custom Storyboard mode?
A: Custom Storyboard supports up to 6 shots per video. Each shot will be sequenced into a cohesive video with smooth transitions between scenes.
Written by
What's Next?