How to Turn Garment Photos into Clean Technical Drawings with AI?
Upload any garment photo and turn it into a clean, editable technical drawing with Style3D AI. This step-by-step guide walks you through prompt, output format selection (PNG or SVG), and pro tips to get the most out of Extract Technical Drawing.

Introduction: What is Extract Technical Drawing?
Getting a clean technical drawing from a garment photo takes time. You trace the silhouette, redraw the construction details, and adjust the lines until they are accurate enough to hand off to a pattern maker or factory. Most of that work happens before anyone has a usable file.
Extract Technical Drawing changes that starting point. Upload any garment photo and Style3D AI generates a precise, clean line drawing of the construction, capturing buttons, seams, pockets, and collars as a flat technical illustration. You can export the result as a PNG for presentations and spec sheets, or as an SVG file for direct editing in Illustrator, CAD tools, or any vector software downstream in your workflow.
Quick Start Guide
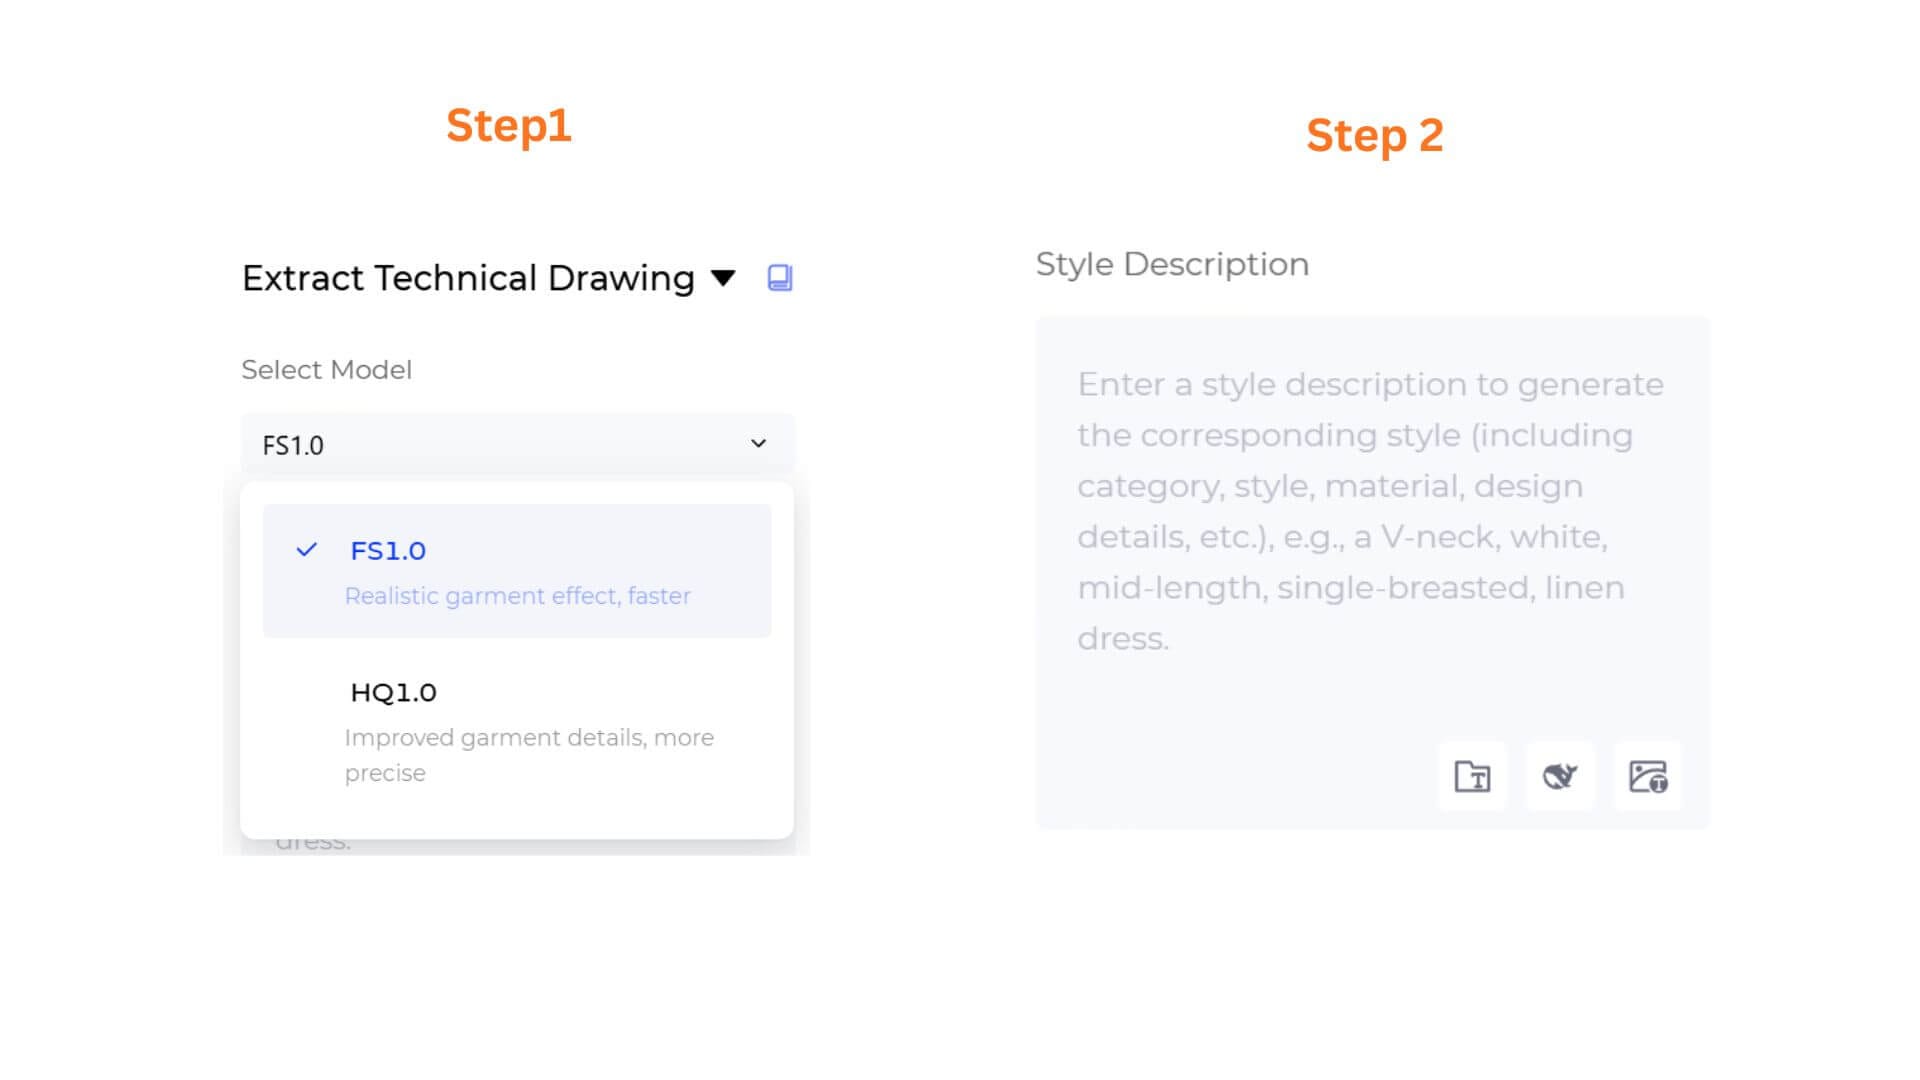
Step 1: Choose Your AI Generation Model
Select the processing engine according to your needs:
• FS1.0 (Fast Speed): Best for rapid iteration and quick reference checks.
• HQ1.0 (High Quality): Optimized for precise line rendering and production-ready technical illustrations.
Step 2: Add a Style Description
In the Style Description box, describe any specific construction details you want the AI to focus on. You can draft your description manually, or use the icon toolbar beneath the text field to speed things up.
• Example: "a V-neck, white, mid-length, single-breasted, linen dress."
Prompt Manager: Click to open the side panel to search, manage, or add custom prompt templates to your workspace.
Opt Prompt: Click to instantly expand a simple idea into professional, highly descriptive prompt options.
Rev Prompt: Click to upload an inspiration or trend reference photo, automatically reverse-engineering the visual into text inside your box.
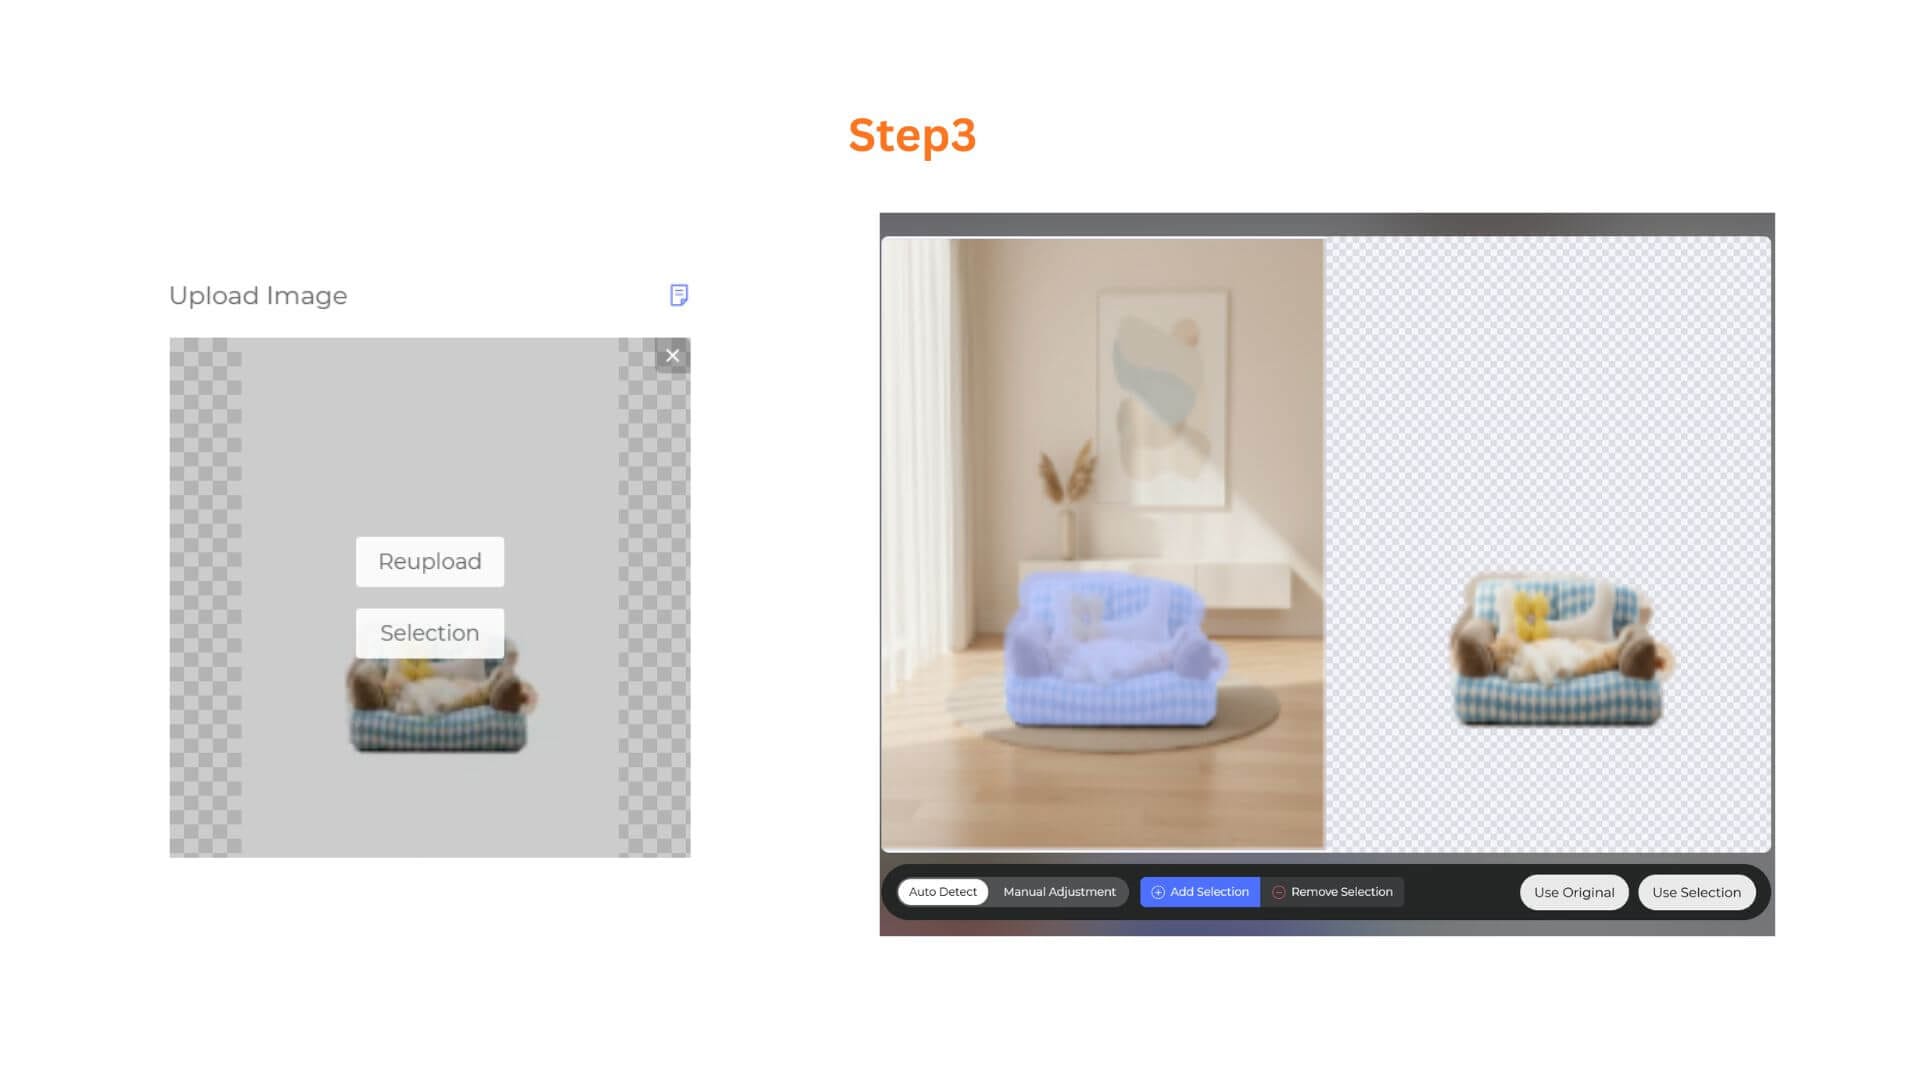
Step 3: Upload Your Garment Image
Click the Upload Image box to add your reference photo. A product shot, flat-lay, or ghost-mannequin image all work well. Once uploaded, two options appear:
• Reupload: Replace the current image with a different one.
• Selection: Select a specific area of the image for the AI to focus on.
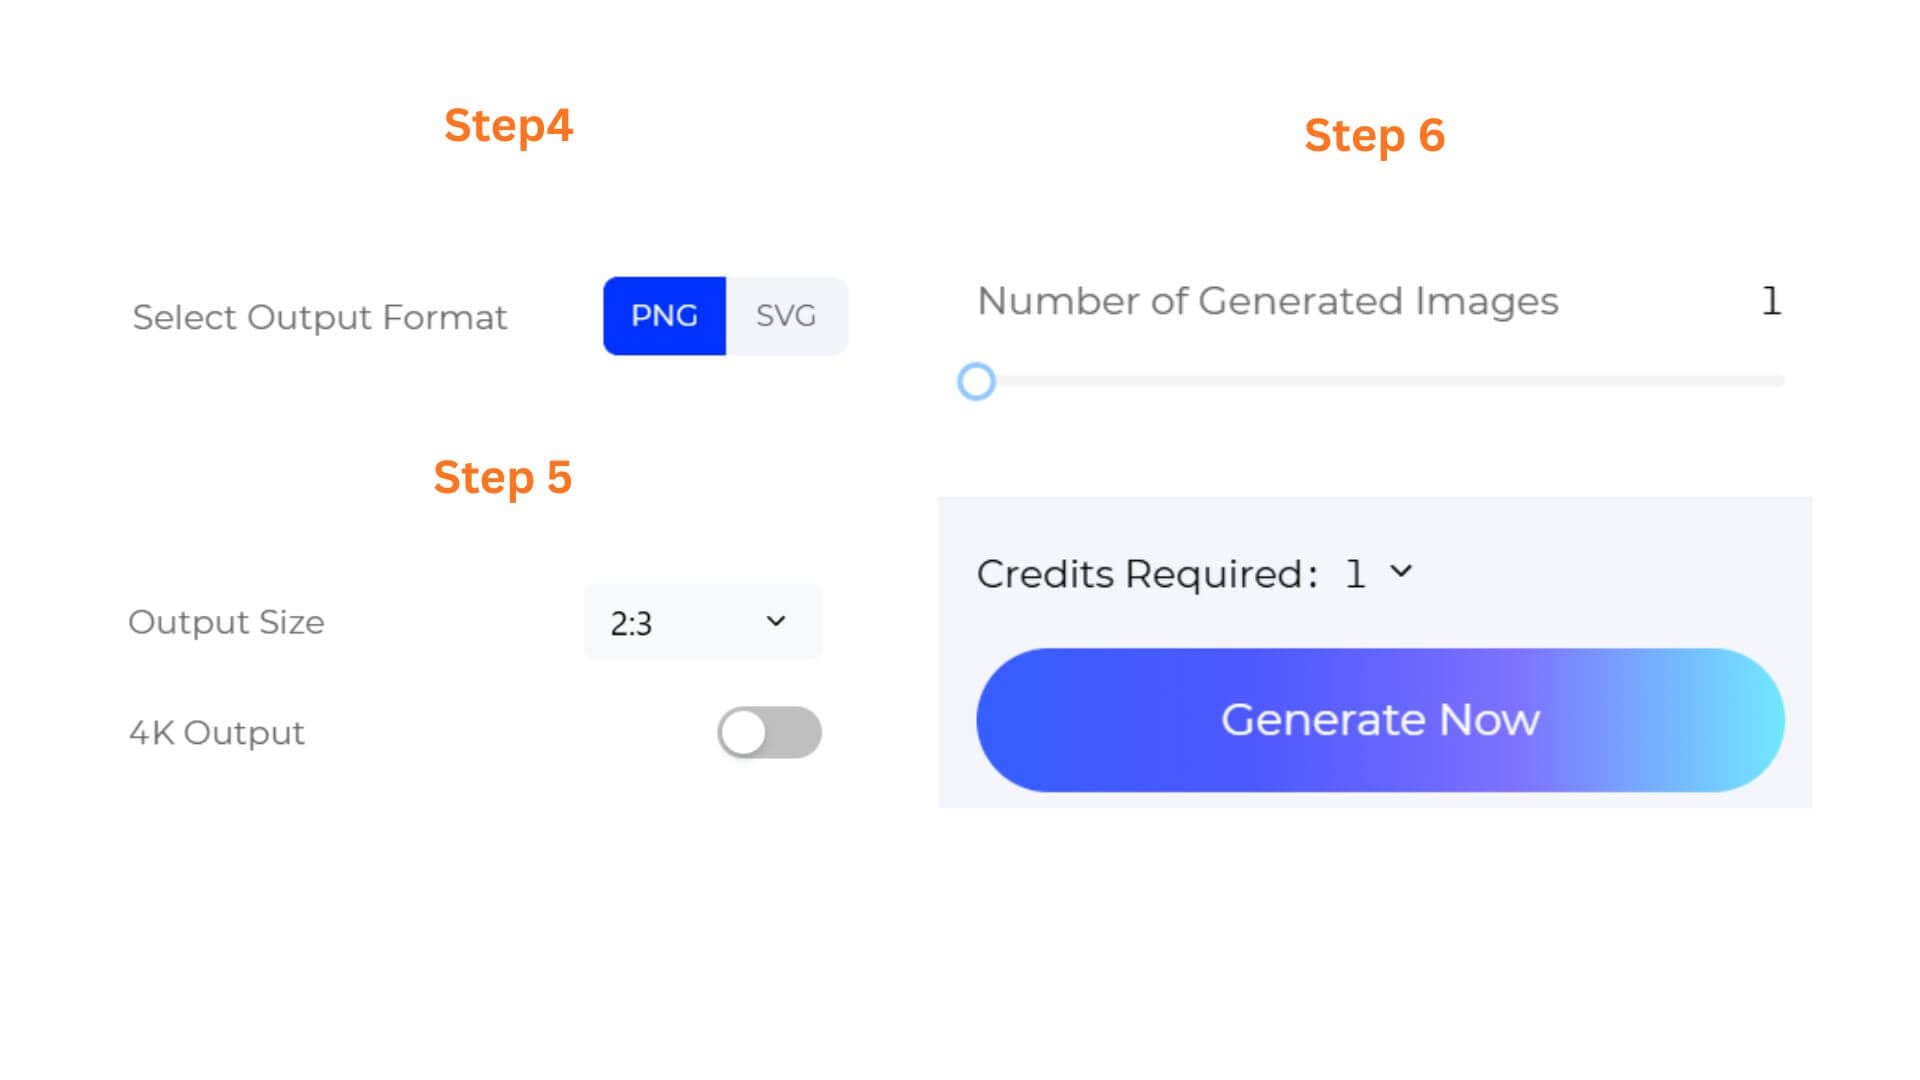
Step 4: Select Your Output Format
Choose how you want to receive the technical drawing:
• PNG: A high-resolution flat image, ready for presentations, mood boards, and spec sheets.
• SVG: A fully editable vector file, ideal for importing directly into Adobe Illustrator, CAD software, or any vector-based design tool.
Step 5: (HQ1.0 only)Configure Output Size & Toggle 4K Resolution
- If you selected HQ1.0, you can select an Output Size to match your intended use, and toggle 4K Output on for ultra-high-definition renders suited for client presentations or premium marketing assets. These options are not available on FS1.0.
- Select an Output Size that matches your intended use (e.g. 2:3 for standard garment reference sheets).
Step 6: Set Batch Quantity & Generate
Use the slider to choose how many variations to generate in one run, from 1 to 4 images. Check the Credits Required counter (default starts at 3 credits), then click the gradient Generate Now button. Your technical drawing is ready to view, download, or bring into your next production step.
Pro-Tips
Use Clean, Well-Lit Reference Photos
The clearer the garment construction is in your reference image, the more accurate the extracted line drawing will be. Flat-lay shots or ghost-mannequin images with a plain background consistently give the best results.
Export SVG for Downstream Editing
If you plan to edit the technical drawing or pass it to a pattern maker or factory, export as SVG. It scales without quality loss and opens directly in Illustrator or any CAD tool, saving you a full round of manual tracing.
Use Selection for Complex Images
If your reference photo includes multiple garments or a busy background, use the Selection tool after uploading to focus the AI on the specific garment you want to extract.
Pair with Sketch to Design
Use Extract Technical Drawing to pull a clean line drawing from an existing product, then bring that line art into Sketch to Design to generate new colorways, fabrics, or style variations. The two tools work well together as a complete design iteration loop.
Try Extract Technical Drawing for Free
Frequently Asked Questions
Q: My extracted drawing is missing some construction details. What should I do?
A: The AI extracts details based on what is visible in the reference photo. If key construction elements like seam lines, pockets, or buttons are obscured by lighting, folds, or the angle of the shot, they may not appear in the output. Use a front-facing, flat, well-lit photo for the most complete extraction. You can also add a Style Description to guide the AI toward specific details you want captured.
Q: When should I use PNG vs SVG?
A: Use PNG if you need a quick visual for a presentation, mood board, or spec sheet and do not plan to edit the line drawing further. Use SVG if you need an editable vector file to refine in Illustrator, pass to a pattern maker, or import into CAD software. SVG gives you full control over the lines after generation.
Q: Can I use Extract Technical Drawing on a photo with multiple garments?
A: Yes. After uploading, use the Selection tool to define the area you want the AI to focus on. This way you can isolate a single garment from a group shot or a styled look and extract its technical drawing cleanly.
Written by
What's Next?