How to Transform Sketches into Striking Apparel Visuals with AI?
Upload a sketch and turn it into a garment visual with Style3D AI "Sketch to Design". This guide covers style description, color settings, and pro tips.

Many designers have a drawer full of sketches that never made it further than the paper. Taking a flat drawing and turning it into something textured, realistic, and ready to present usually means hours of 3D modeling and technical rendering work.
Sketch to Design handles that conversion for you. Upload your sketch, describe the style you have in mind, and Style3D AI applies fabric drape, realistic textures, shading, and color directly onto your 2D lines. What starts as a rough drawing becomes a presentation-ready visual in seconds.
Quick Start Guide
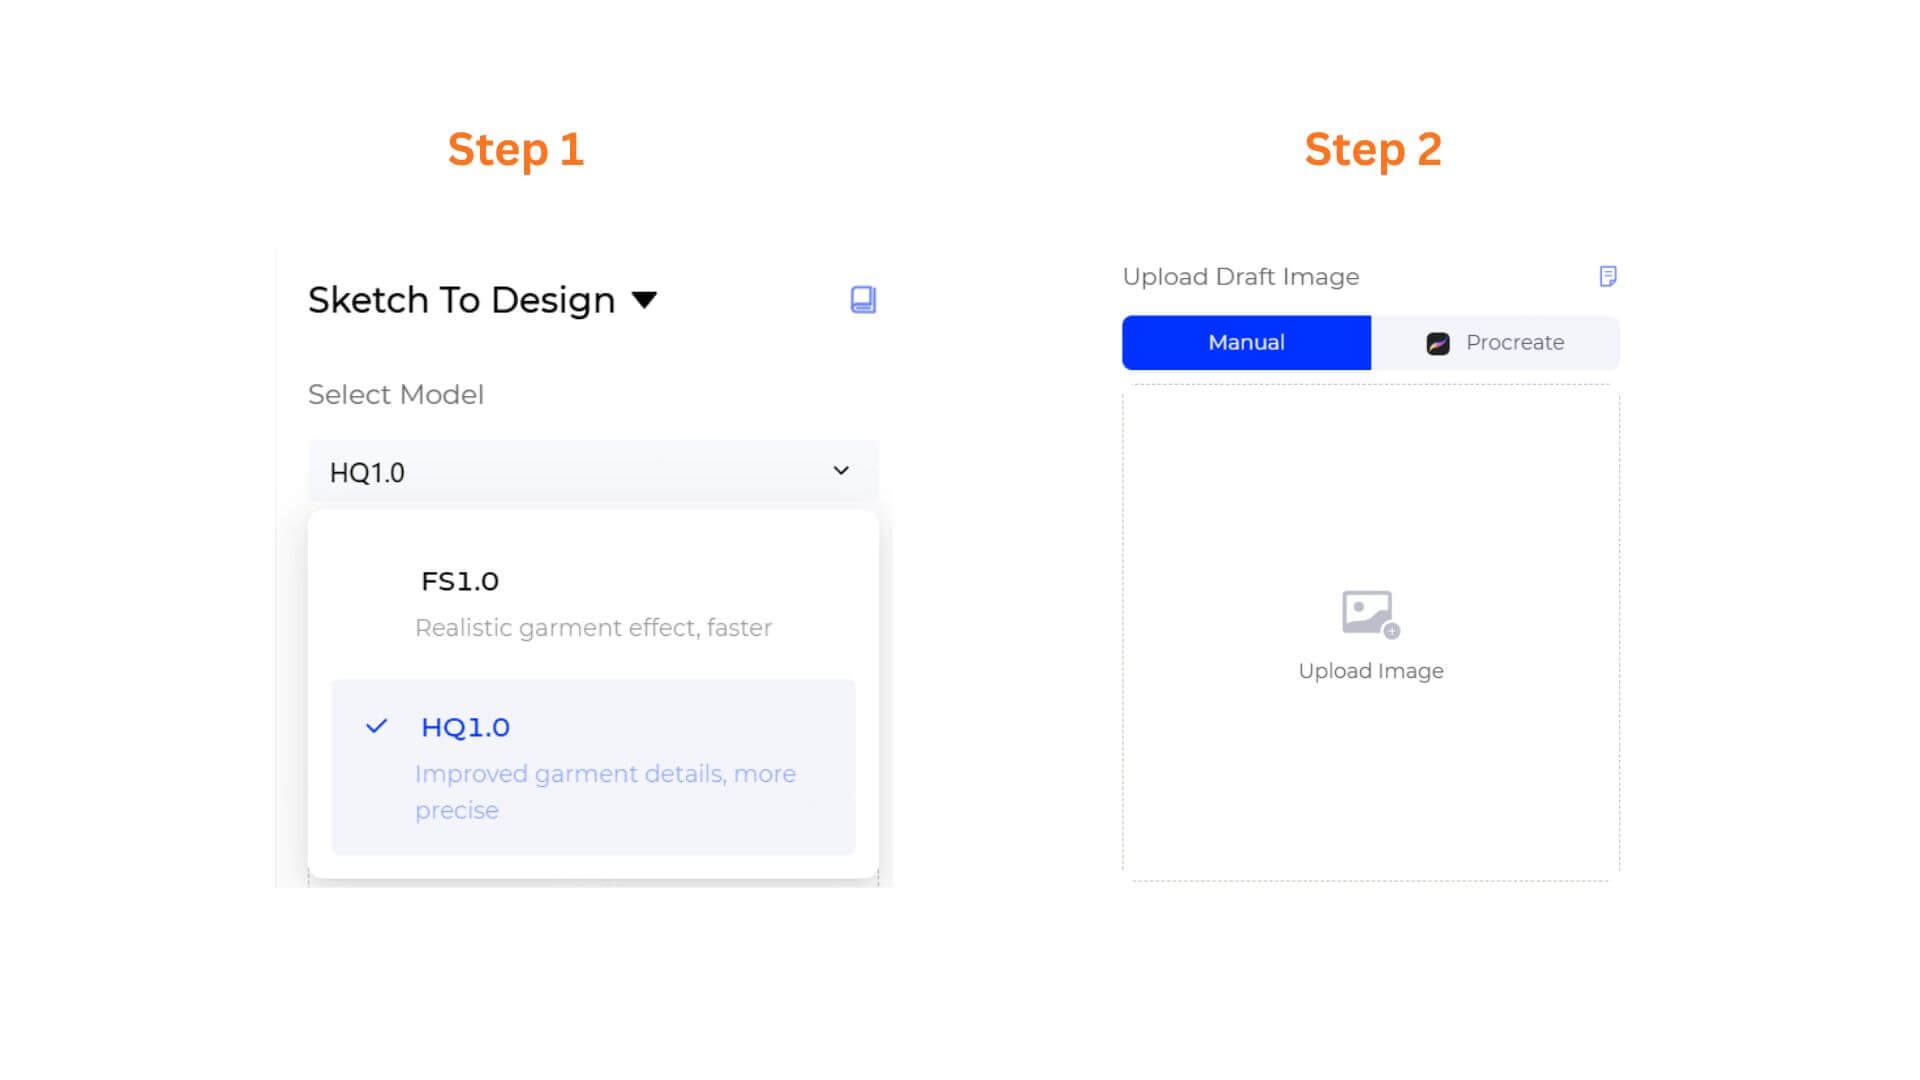
Step 1: Choose Your AI Generation Model
Select the processing engine tailored to your need:
- FS1.0 (Fast Speed): Optimized for high-speed visual iterations and rapid layout brainstorming.
- HQ1.0 (High Quality): Engineered for professional presentation graphics and retail-ready aesthetics.
Step 2: Upload Your Baseline Draft Image
Navigate to the Upload Draft Image container.
- Toggle your workspace preference—Manual (for raw drawings or scanned papers) or Procreate (for digital canvas layouts)—then click the center icon to upload your sketch line art.
- Once uploaded, the canvas will reveal operational toggles: Adjust (to fine-tune sketch line detection) and Exit (to clear the canvas).
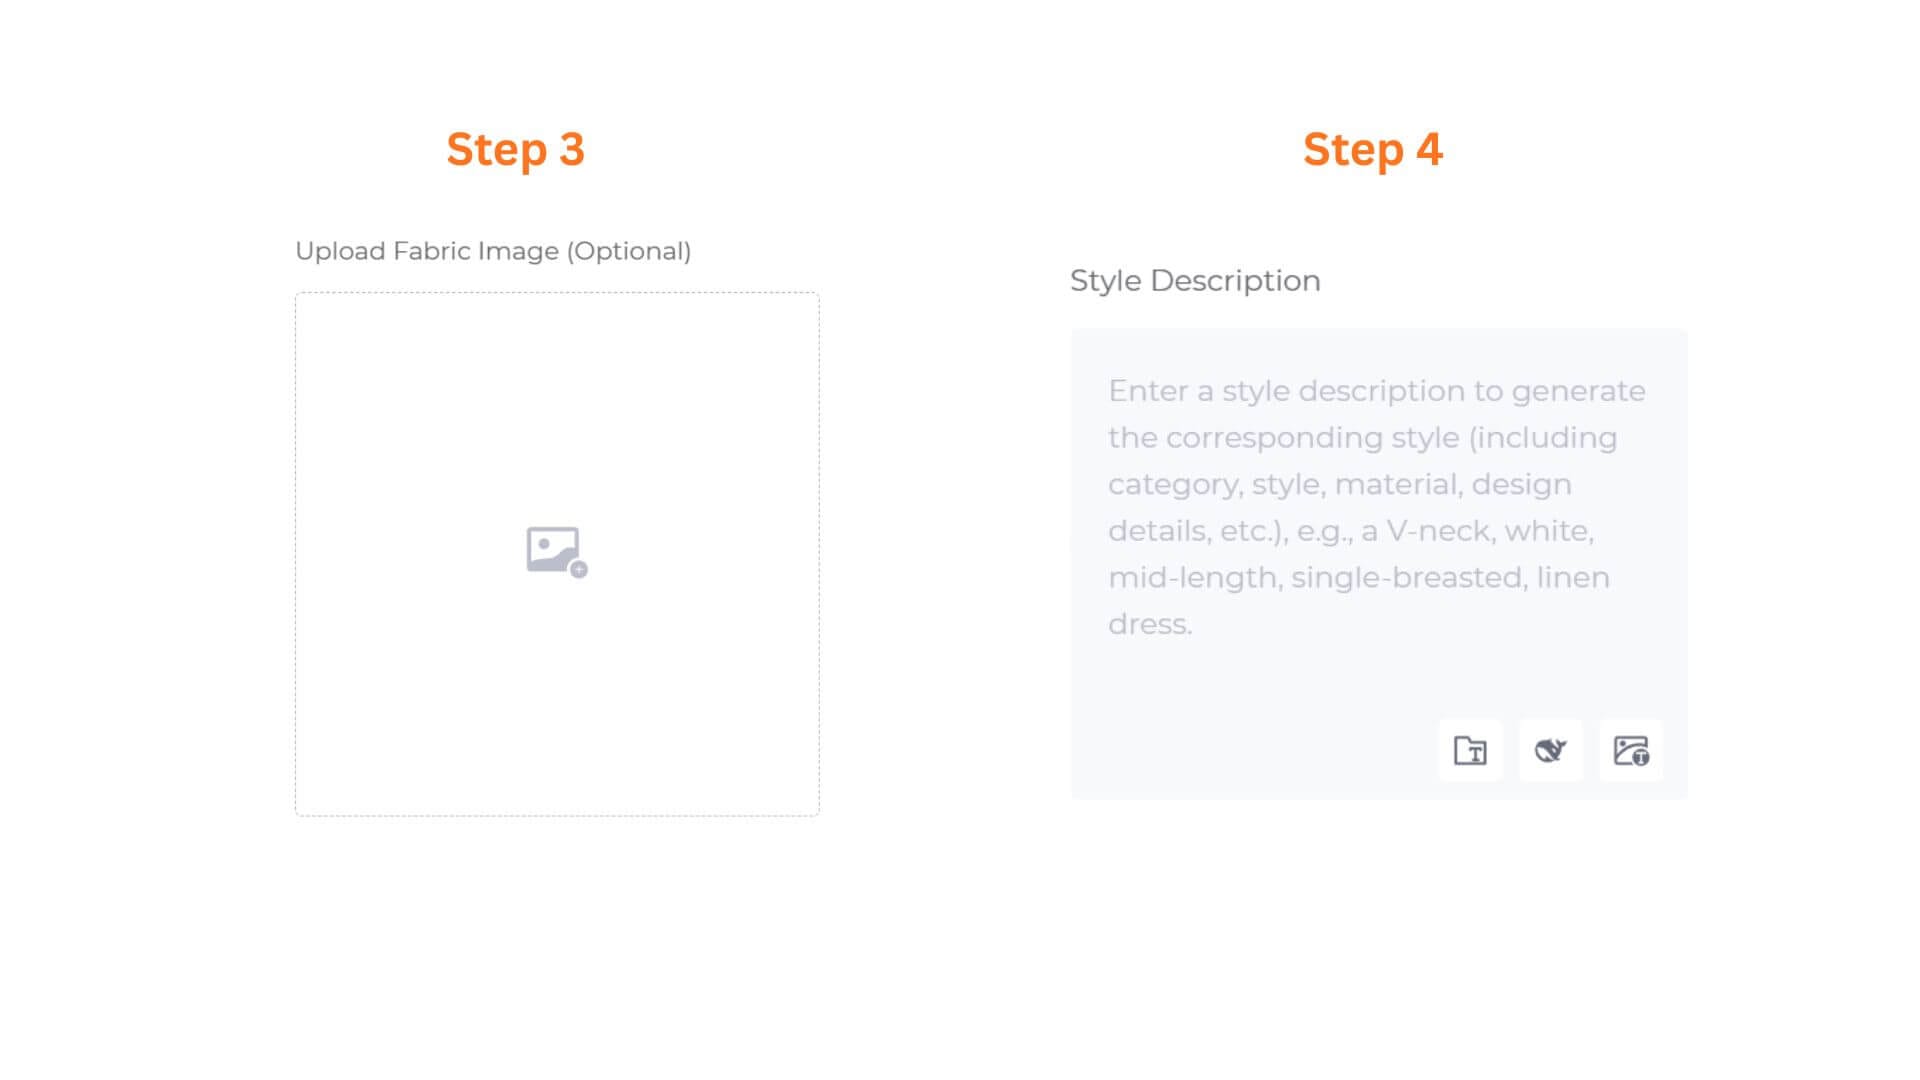
Step 3: Map Your Textures via Fabric Upload (Optional)
- To enforce a specific textile pattern, print weave, or fabric swatch onto your sketch lines, upload your reference image directly into the Upload Fabric Image (Optional) block.
Step 4: Define Your Design via Style Description
- Go to the Style Description text block to input your specific style modifiers, material selections, and tailoring details.
- Guidance Format: Provide full descriptive context including category, style, material, and design details. You can follow the system's structural hint format: "e.g., a V-neck, white, mid-length, single-breasted, linen dress."
- Smart Toolbar: Click the three icon shortcuts at the footer of the field to instantly optimize your descriptive vocabulary or reset entries.
Prompt Manager: Click to open the side panel to search, manage, or add custom prompt templates to your workspace.
Opt Prompt: Click to instantly expand a simple idea into professional, highly descriptive prompt options.
Rev Prompt: Click to upload an inspiration or trend reference photo, automatically reverse-engineering the visual into text inside your box.
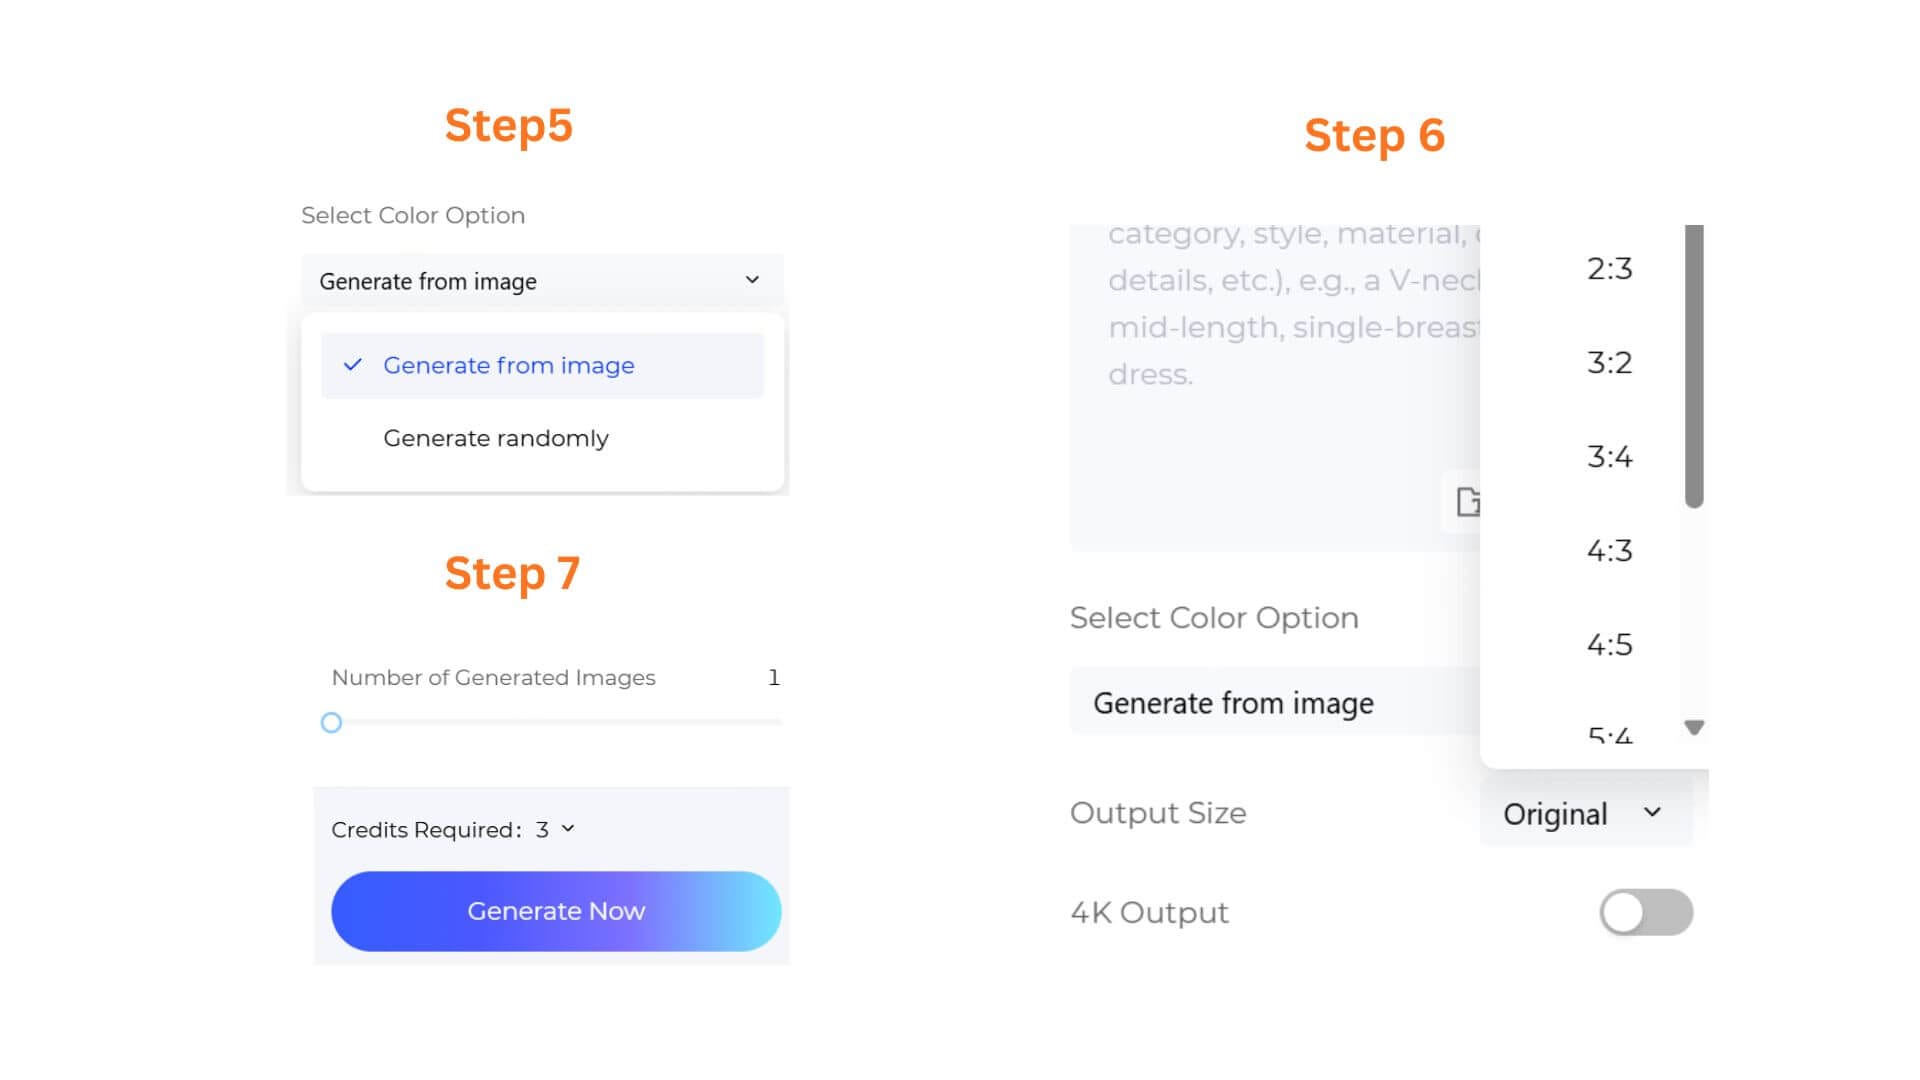
Step 5: Configure the Color Option Mode
Locate the Select Color Option drop-down box below the description panel.
- Generate from image: Instructs the AI model to preserve and interpret the native shades, background tones, or original coloring of your uploaded sketch.
- Generate randomly: Bypasses the sketch's raw color properties, allowing the AI to suggest entirely fresh commercial palette variations based on your text description.
Step 6: (HQ1.0 only)Configure Output Size & Toggle 4K Resolution
- If you selected HQ1.0, you can select an Output Size to match your intended use, and toggle 4K Output on for ultra-high-definition renders suited for client presentations or premium marketing assets. These options are not available on FS1.0.
- Select an Output Size that matches your intended use (e.g. 2:3 for standard garment reference sheets).
Step 7: Set Batch Quantities & Render
- Use the slider to determine how many design variations you want to output in a single run, from 1 to 4 images.
- Verify the Credits Required counter (e.g., 3 Credits), click the vibrant “Generate Now” button, and watch your 2D lines transform into realistic digital clothing instantly!
Pro-Tips
Explore Diverse Application Scenarios:
Use Sketch To Design for more than just flat coloring. It’s an incredibly versatile toolkit for running instant digital textile tests on a single design layout, creating multi-colorway collection previews directly from an initial sketch, or building rapid visual presentation assets for your global audience.
Bypass Post-Production Bottlenecks:
Whether you are an independent creator styling a digital portfolio or a business owner managing an online storefront, physical sampling and sample photography can be massive, slow-moving bottlenecks. By utilizing the Manual or Procreate workflows combined with 4K Output, you can completely eliminate traditional sampling costs. This powerful synergy allows anyone to render flawless, marketplace-ready apparel visuals directly from raw line drawings in mere seconds.
Mastering the Color Settings:
When uploading heavily shaded drawings or digital concept sketches with pre-blocked colors, stick to Generate from image to ensure the AI honors your foundational color blocking. If you are working with purely clean black-and-white line art, toggle to Generate randomly and use the Style Description box to steer the aesthetic into entirely unmapped color territories.
Start using Style3D’s immersive fashion experiences today to transform your fashion workflow and revolutionize your experience!
Frequently Asked Questions
Q: Does my sketch need to be professionally drawn?
A: No.
The AI focuses on garment structure rather than artistic quality. Even a simple sketch can produce strong results if the silhouette, neckline, sleeves, and key design details are clearly defined.
Q: When should I upload a fabric reference?
A: Upload a fabric reference when material appearance is an important part of the design.
This is particularly useful for fabrics with distinctive textures, such as denim, tweed, knitwear, leather, or satin.
If no fabric image is provided, the AI will infer the material based on your text description.
Q: Which color mode should I choose?
A: Choose based on your sketch.
Generate from Image is recommended for colored sketches or illustrations where you want to preserve the existing color direction.
Written by
What's Next?

How to Turn Garment Photos into Clean Technical Drawings with AI?
Upload any garment photo and turn it into a clean, editable technical drawing with Style3D AI. This step-by-step guide walks you through prompt, output format selection (PNG or SVG), and pro tips to get the most out of Extract Technical Drawing.