AI Outfit Changer: Why Layered Looks Are Harder
An AI outfit changer handles one garment well and a full look badly. Why layer boundaries break, and what to photograph instead.
Swapping one garment is a bounded problem. The region to rebuild has a visible edge on every side, and whatever sits behind it — a body, a background — is either visible elsewhere in the frame or predictable. Swapping a full look is a different problem wearing the same name.
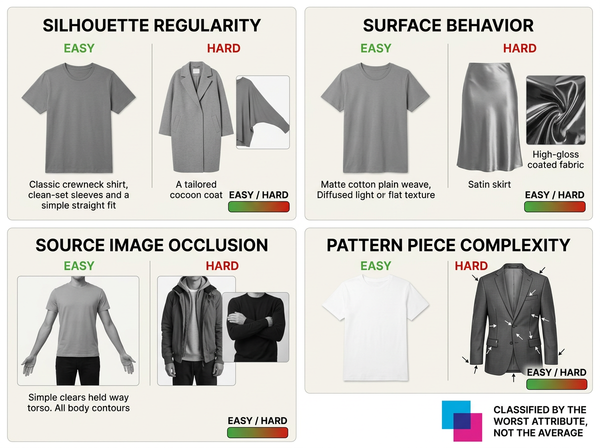
A jacket over a shirt over a tee hides most of the shirt and nearly all of the tee. What survives in the image is a collar, a cuff, a strip at the hem. Those fragments are the only evidence of two garments, and the change has to invent everything else while keeping the invented parts consistent with each other. That is where layered work stops behaving like single-garment work.
What a layer boundary actually costs
Every additional layer adds edges rather than area, and edges are what get reconstructed badly.
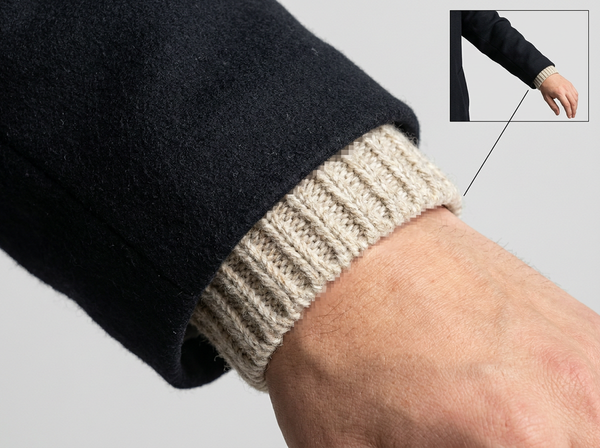
Consider what happens at a cuff. The sleeve of an outer layer ends, an inner sleeve appears for a centimeter or two, and skin begins. Three materials meet across a short run of pixels, in a place where the arm is usually in motion or at an angle. The change has to decide where each boundary sits, and a small error there reads as a garment that does not fit rather than as an image defect.
Now consider the neckline, where a collar, a crew neck and skin can meet in an area of similar size. These junctions are where a viewer’s eye goes first, because they are how people read what someone is wearing.
The count matters more than the complexity of any single piece. Two simple layers are usually harder than one complicated garment, since a complicated garment has one boundary to the body while two simple ones have a boundary to the body, a boundary to each other, and a shared relationship to maintain.
Openings make this worse in a way that is easy to miss when planning a shoot. An open shirt worn over a tee creates a boundary that runs the full height of the torso and changes direction with the body, and it exposes the inner layer along an edge rather than at a fixed point. A closed jacket over the same tee is a far simpler reconstruction, because the inner garment appears only at collar and cuff. Two products that a merchandiser would describe identically can therefore behave completely differently.
The proportion problem
Fragments do not carry length. A visible strip of shirt at the hem tells the model that a shirt exists and roughly what color it is. It does not say whether that shirt reaches the hip or the mid-thigh, and a generated version has to pick.
Picking wrong produces a specific kind of failure that reviewers miss because each element looks correct on its own. The jacket is right, the shirt is right, the tee is right, and the stack reads as clothes that were bought separately and never tried on together. Buyers notice this without being able to name it, which is worse than an obvious artifact — an obvious artifact gets rejected, while a proportion error gets published.
Sleeve length relationships fail the same way. An inner sleeve that should show at the cuff can disappear entirely, or appear where the outer sleeve is longer than it was, and either version quietly changes what the customer thinks they are buying.
Volume has the same problem as length. A chunky knit under a coat pushes the outer layer outward in a way a thin base layer does not, and a fragment at the collar carries almost no information about how much bulk sits beneath. Outputs tend toward the thinner reading, which makes a layered look appear neater on screen than the same pieces do in a fitting room.
Single garment or full look: how to decide
Situation | Better as | Reason |
One hero piece, styled over existing basics | Single garment | The layers you keep are photographed, not inferred |
A full outfit sold as a set | Full look, with slow review | The relationship between pieces is the product |
Colorway variants of the outer piece only | Single garment | Nothing about the inner layers needs to change |
Seasonal styling for a category page | Single garment on a fixed base | Consistency across the page matters more than variety |
Anything with three or more visible layers | Photograph it | The fragment evidence is too thin to reconstruct from |
The pattern is that changing one element against a photographed background beats generating the whole stack. Running a swap on the outer piece alone keeps every layer you did not touch anchored to a real photograph, which removes most of the proportion risk in one decision.
Layering in motion
Video adds a requirement that stills do not have: the invented relationships must stay the same from frame to frame.
A hem that sits at the hip in one frame and slightly above it in the next produces a garment that appears to breathe. The same applies to the strip of inner sleeve at a cuff, which can flicker in and out of existence as the arm moves. Neither error is visible in a single extracted frame, which is why reviewing stills from a clip gives a false sense of what shipped.
Occlusion changes across a clip too. An arm crossing the body hides a boundary in some frames and reveals it in others, and the reconstruction on either side of that gap has to agree. When carrying an outfit change across frames, the practical rule is to keep motion simple and the layer count low — a slow turn in a single-layer look survives far better than a walk in a three-layer one.
What makes a layered attempt more likely to work
• Photograph the base layers on the model and change only the outer piece, so the layers you keep are evidence rather than inference.
• Choose poses with arms clear of the torso and hands away from the waist, since these are the two places layer boundaries cluster.
• Supply the inner garment’s full length in the reference set even when most of it will be hidden, because the fragment the model sees is not enough to establish proportion.
• Keep tonal separation between layers, as two similar mid-tones make the boundary between them unreliable in a way high contrast does not.
• Review the junctions first — cuff, neckline, hem overlap — rather than reviewing the outfit as a whole.
None of this makes a three-layer look easy. It moves a two-layer look from unpredictable to reviewable, which is usually the practical goal.
Why the failures look the way they do
Layered failures are the general failure modes of a garment change, concentrated at the places layers meet. Structure drifts because a boundary is ambiguous. Pattern breaks because a panel gets interrupted and resumed. Color shifts because a fabric is being inferred from a fragment.
That is worth knowing before optimizing anything, since the fixes are the same fixes and the reasons are the same reasons — described in how a clothes swap is actually computed. What layering changes is the density: more boundaries per image means more opportunities for the same failure, in the areas customers look at most.
What outfit changing cannot do
It cannot tell you whether pieces work together as a set. A generated stack is a plausible arrangement of garments, not a styling judgment, and no stage in the process evaluates whether the proportions flatter a body or suit the pieces.
It cannot establish length. Where an inner garment ends is a fact about the product that lives in the tech pack and the sample, and it is absent from a photograph that shows only a fragment. A generated length is a guess presented at the same confidence as a photograph.
It cannot handle sheer or semi-transparent layers reliably. A layer you can see through is a boundary that is not a boundary, which is the case reconstruction is worst at. Lace over slip, chiffon over lining and mesh panels belong on the photographic path.
It cannot make a three-layer look behave like a two-layer one through better settings. The constraint is how much of each garment is visible, and no configuration adds visible area to a photograph.
Frequently Asked Questions
Is two layers meaningfully harder than one? Yes, and the jump from one to two is larger than the jump from two to three, because the second layer introduces garment-to-garment boundaries that did not exist before. A tee under an open shirt is already a different problem from a tee alone. Treat two layers as the point where review has to slow down.
Can I change just the outer layer? Yes, and it is usually the right approach. Photographing the base and changing only the outer piece keeps every inner layer anchored to a real image, which removes the proportion guessing entirely. This is the single most useful habit for layered catalog work.
Why do sleeve and hem lengths come out wrong? Because a fragment carries color and texture but not extent. A strip of inner sleeve at a cuff establishes that a sleeve exists, and the length gets filled in from what is typical rather than from what is true. Supplying the full inner garment in the reference set reduces this without eliminating it.
Does the same problem apply to accessories? Partly. Bags, scarves and belts create occlusion in the same way and interrupt garment panels, but they usually sit on top of everything and can be composited rather than generated. Where an accessory crosses a printed area or a seam, treat it as another layer boundary.
How should layered outputs be reviewed differently? Review the junctions before the whole. Check the cuff, the neckline and the hem overlap at full zoom first, then look at the outfit as a composition, since a stack that fails at the junctions will fail regardless of how good the overall impression is. Reviewing the impression first tends to produce approvals that do not survive a customer’s zoom.
Do the same rules apply to menswear and womenswear equally? The mechanics are identical, but the exposure differs by category convention. Menswear layering tends to involve closed outer pieces with small reveals at collar and cuff, which is the easier case, while womenswear more often uses open layers, asymmetric lengths and sheer pieces. Judge by how the layers meet rather than by department.
Is layered video worth attempting at all? For simple two-layer looks with controlled motion, sometimes. For anything more, the frame-to-frame consistency requirement compounds fast enough that the review cost exceeds what the output saves. Get layered stills working reliably before adding motion.
Change one thing, photograph the rest
The instinct with a full look is to generate the whole thing, and it is usually the expensive instinct. Every layer you photograph is a layer that cannot drift, cannot lose its length, and cannot disagree with itself between frames. Changing one element against a real photographed base gives most of the variation benefit at a fraction of the reconstruction risk, and it keeps the review on a small number of junctions rather than on an entire outfit.
Start with two layers, not five
Shoot the base layers on the model and change only the outer piece. Prepare the outer garment as usual — front flat-lay, back flat-lay, one construction detail — and include the full inner garment reference even though most of it will be hidden, since the fragment alone will not establish length. Review the cuff, neckline and hem overlap at full zoom before looking at the outfit as a whole.
→ AI Video Outfit Changer — Style3D AI
Written by