Enhancing an Image Is Not the Same as Upscaling It
Sharpening redistributes contrast; upscaling makes new pixels. Confusing them is why teams conclude that upscaling does not work, and what it costs.
Two buttons sit next to each other in most image tools, and they do unrelated things. One adjusts how the picture presents the information it already has. The other produces information the picture does not have. They are often described with the same words — clearer, sharper, better — and the confusion between them is behind one of the most common wrong conclusions in apparel imaging: that upscaling does not work.
The teams who say that have usually never upscaled anything. They enhanced a file, looked at it large, saw it fall apart, and drew a conclusion about a different operation.
Sharpening moves contrast, it does not add information
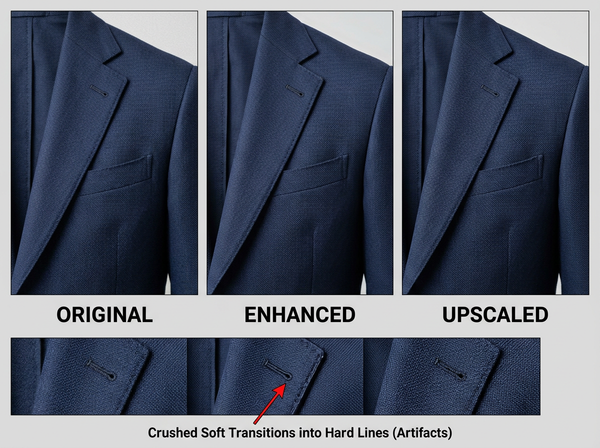
Sharpening finds edges and pushes the tones on either side apart. The dark side goes darker, the light side goes lighter, and the eye reads the increased local contrast as detail. Nothing has been added. The same information has been redistributed so that the transitions become more emphatic.
Local contrast adjustments work the same way at a larger scale, opening up the midtones within a region so that texture appears to lift off the surface. Noise reduction runs in the opposite direction, smoothing small variations that the sharpening pass then re-emphasizes as edges.
Those two are almost always applied together, and their combined effect is worth stating plainly: real microstructure is removed and artificial edge definition is put in its place. The result reads as crisper than the original while containing less of what was actually in front of the lens. The photo enhancer in Style3D AI is doing this category of work — adjusting how the existing image presents itself — which is the right operation when presentation is the problem and the wrong one when size is.
The misdiagnosis that follows
Here is the sequence, and most teams have run it at least once. Someone needs a larger image than the file they have. They open an enhancement tool because that is the one they know, run it, place the result at the size they needed, and see something soft, plasticky and short on detail. The conclusion is that these tools cannot recover detail and that the whole category is oversold.
The conclusion is about an operation that was never performed. Upscaling generates new pixels and has to decide what belongs in them, which is a generative problem with its own risks and its own failure modes. Enhancement never faced that problem, because it kept the same grid and only changed the values on it.
The practical damage is that the misdiagnosis closes off the correct fix. A team that believes upscaling does not work will go on shipping small images, or will re-shoot work that did not need re-shooting, or will accept a soft product page because they think the ceiling has been reached.
What enhancement costs
Every enhancement pass has a price, and the price is usually paid by someone downstream rather than by the person who ran it.
Transitions get compressed. Any boundary in the image — hair against background, the edge of a garment, the fuzz at the surface of a brushed fabric — is a band of partially covered pixels, and sharpening squeezes that band toward a line. A cutout made from an enhanced file has less to work with than one made from the original, and the loss is not recoverable afterward.
Fabrics converge. Local contrast applied globally pushes every surface toward the same kind of crispness, so a dry cotton, a slubby linen and a fine wool all move toward a generic textured look. Surface behavior is one of the few genuine pieces of evidence a photograph carries about a material, and enhancement is very effective at removing exactly that.
Color stops being reviewable. Enhancement passes usually raise saturation and contrast along with sharpness, which means the file no longer represents the color it started with. Anything relying on the distinction between recoloring and correcting breaks at that point, because an approval made against an enhanced file is an approval of something the garment does not look like.
Compression artifacts get promoted. A file that has already been through heavy compression contains block boundaries, and sharpening treats those boundaries as edges worth emphasizing. The enhanced version is more damaged than the original in a way that is easy to see once you know the pattern, and impossible to unsee afterward.
What you are actually missing
Symptom | What is actually missing | The right move |
Looks soft at the size you need it | Pixels; the file is smaller than the placement | Re-export from the source, or upscale |
Looks flat, gray or lifeless at the correct size | Presentation; contrast and tone | Enhance, or better, grade it deliberately |
Blocky patches around edges and in flat areas | Nothing recoverable; the file has been compressed | Go back to the original file |
Texture is hard to make out in a detail crop | Either scale or the shot itself | Check the frame first; a texture shot too far back cannot be rescued |
The print reads as mush in the thumbnail | Scale in the design, not resolution in the file | A scale decision, not an image processing one |
Fine, but you want it to look more expensive | Nothing; this is a lighting and styling question | Neither operation solves it |
The first row hides the most common case of all. Most files that are too small are derived files rather than originals: something downloaded from a platform, pulled out of a deck, forwarded through email or exported for the web years ago. Before any processing decision, find out whether the camera original or the master export still exists, because retrieving it beats both operations and takes less time than either.
What enhancement cannot do
• It cannot add structure that is not in the file, so a thread, a stitch or a weave that was never resolved does not come back.
• It cannot recover detail that compression removed, and it will make the damage more visible by sharpening the artifacts it left.
• It cannot substitute for a larger file, because changing values on a grid does not change the size of the grid.
• It cannot preserve the fabric’s own surface behavior, since the operation that makes a surface read as crisper is indifferent to which surface it is.
There is a quieter cost as well. An enhanced file looks better in isolation and worse in a set, because the enhancement was tuned to one image rather than to the group. A single processed image dropped into a page of unprocessed ones is visible immediately, usually as a picture that seems to have more contrast and slightly different color than its neighbors.
Order of operations
Enhancement belongs at the end. It is a presentation decision made for a specific placement, which means it should happen after every structural operation — cutout, swap, recolor, composition, extension — and after the file has been sized for where it is going.
Keep enhanced files out of the input library, for the same reason generated flat lays and extended images stay out of it. Downstream processes cannot tell an artificial edge from a photographed one, so an enhanced file passed into a cutout or a try-on hands over compressed transitions and invented crispness as though they were evidence about the garment.
Where both operations are genuinely needed, upscale first and enhance afterward, and review between them. Running an enhancement before an upscale gives the upscaling step a file whose transitions have already been squeezed, which is the worst input you can hand to an operation that has to decide what belongs between existing pixels.
Common questions
How do we tell which one a tool is doing?
Check whether the output has more pixels than the input. If the dimensions are unchanged, the tool adjusted values and nothing was added; if they grew, something generated content to fill the new grid. Tool names are not reliable here, and the same product often offers both under one label.
Our source file is genuinely gone. What now?
Upscale rather than enhance, and treat the result as a reconstruction rather than a record. Look specifically at the regions that carry meaning — closures, seams, print motifs, logos — because those are where invented structure becomes a claim about the product. If the garment still exists and the image matters, a reshoot is cheaper than the review this file will need forever.
Is enhancement ever the right answer on a product image?
It is, at the end of the chain, for a specific placement, applied consistently across the set rather than to one image. A batch that was shot flat and needs to be brought up for a page is a reasonable use. The failure mode is one image getting attention because someone was looking at it that day.
Why do enhanced images look worse when we cut them out?
Sharpening compresses the transition band at the edge of the garment, and that band is what a cutout uses to decide what belongs to the subject. With the band squeezed toward a line, the cutout has less information and produces a harder, less accurate edge. Cut out first, enhance last.
Can we enhance images before sending them to a marketplace?
Marketplaces re-encode what you send, so an enhanced file arrives with its sharpened edges compressed a second time, and halos are one of the first things to survive that process visibly. Send the cleanest version at the required size and let the platform do its own processing. Anything you add beforehand is processed twice.
The client says the photo looks blurry. How do we work out which fix applies?
View it at the exact size it will be used, not zoomed to fit or at full resolution. Blurriness at the placement size is a size problem; blurriness only when zoomed beyond the placement is not a problem at all. That single check resolves most of these requests before any tool is opened.
The question behind both buttons
What separates these two operations is what they are being asked for. Enhancement is a request about appearance, and it answers with the information already in the file. Upscaling is a request about size, and it answers by inventing plausible content at a finer grain than the camera recorded. Confusing them is what produces the wrong conclusion that neither works. Getting them straight costs nothing, takes one look at the pixel dimensions, and usually ends with the discovery that the file everyone needed was on the drive the whole time.
Check the dimensions before you reach for either
Open the file someone called blurry and view it at the size it will actually appear. If it holds up, there is nothing to fix. If it does not, check whether the file is smaller than the placement — that is a size problem and no amount of sharpening will address it. Then look for the original before you process the copy, because most of the small files in circulation are derivatives of something bigger that still exists.
→ Photo enhancer: https://www.style3d.ai/image-editing-tools/photo-enhancer
Written by