When a Print Can Be Patched and When It Has to Be Redrawn
Repairing a photo of a print and repairing the artwork are different jobs. Which damage can be patched, which needs a rescan, and which needs a reshoot.
A damaged print looks like a local problem. There is a highlight blowing out one corner of a shirt, a crease breaking the pattern across the chest, a stain on an archive sample, an edge missing from a scan. Select the area, repair it, move on.
The reason it does not work that way is that the thing being repaired is not a region. It is a system of relationships, and a patch that satisfies its immediate neighbors can still be wrong about the pattern as a whole. That failure is invisible at the size people review it at, which is why prints get approved damaged more often than any other kind of image.
A print repair is not a color repair
Repairing a flat surface means matching a color and a texture to the surrounding area. Repairing a print means producing the pattern that belongs there: which motif, at what size, in what orientation, at what position in the cycle.
Only the first of those is available from the immediate surroundings. The rest come from the structure of the pattern, and structure is only visible if enough of the pattern is in the frame. Repair a small gap in a dense floral and the answer is heavily constrained by what is around it. Repair a gap that swallows most of one motif in a widely spaced print and there is nothing left to constrain it, so the result is a motif invented to look like the others.
Invented motifs are the ones nobody catches. They are drawn in the same style, in the same colors, at the same weight. They are simply not the motif your artwork contains, and every downstream use — a colorway, a size run, a print file — assumes they are.
The patch has to land in phase
Any repeating print sits in a cycle: the motif returns at a fixed interval in both directions, and every point on the garment has a position within that cycle. An earlier piece on repeats and scale covers why that structure decides how a print reads on a body. For repair work, it adds a requirement most retouching does not have.
A patch has to be in phase. Matching the fabric at the boundary of the patch is not enough, because a repair can continue perfectly across its own edges while sitting at the wrong position in the cycle. The motif spacing inside the patch will then disagree with the spacing of the pattern beyond it, and the eye reads that as a shift in density or a place where the print seems to bunch.
Phase errors have a signature: the repair looks flawless at the crop and wrong at the garment. That is the exact opposite of how a retoucher’s instinct works, and it is why print repairs need to be reviewed at a scale nobody usually opens them at.
Whether phase can be recovered at all depends on how much of the cycle the image contains. The print repair tool in Style3D AI works from the image and the region you mark, which means it can only infer the cycle from the repeats it can see. A crop holding several full repeats gives it the structure; a tight crop holding part of one gives it a texture and no structure at all.
Colors in a print are roles, not values
The second requirement comes from color. An earlier piece argued that the colors in a print are roles rather than values: a ground, a primary motif, an accent, an outline, each doing a job relative to the others.
A repair samples from its surroundings and produces something that sits comfortably among them, which is not the same as preserving the roles. Where the damaged area contained an outline and the surrounding region does not, the repair will usually merge the outline into the motif or the ground, because that is the more probable local answer. At the patch, this reads as slightly softer. Across the artwork, one role has quietly disappeared from that area.
The consequence arrives later. Recolor the print into a second colorway and the roles get remapped, so an area where the outline was absorbed into the ground now takes the ground’s new color across a shape that was supposed to keep its edge. A repair that passed review in one colorway breaks visibly in the next, and by then it is in the artwork.
Photo repair and file repair are different jobs
Repairing a print in a photograph fixes that photograph. Repairing artwork fixes everything made from it. The two get the same request and the same tooling, and they answer to different standards: a photo repair has to hold up in one image at one size, while artwork has to hold up tiled, graded across a size run, separated for print and rebuilt in every colorway.
What is damaged | The right move | Why |
A highlight or reflection covering part of the print in one photo | Repair the photo | The pattern beyond the blown area supplies the structure, and the fix stays inside that image |
The pattern distorted across a crease or fold | Reshoot or use another frame | The distortion is a three-dimensional effect; a flat patch removes the fold’s evidence rather than the fold |
A stain, tear or fade on an archive sample | Repair, and record that the result is a proposal | The original is gone, so the repaired file is your best reconstruction rather than a record |
A missing edge on a scan of artwork | Rescan | The edge exists on the physical artwork, which makes this a scanning problem, not a generation problem |
A motif fully hidden by a hand, a prop or a fold | Reshoot | Nothing in the image says what that motif looks like |
Artwork you still hold the source file for | Go back to the source | Any repair to a derived image is work you will do again on the next use |
The last row is the one worth enforcing as a rule. Where the source artwork exists, repairing a photograph of it is a decision to keep the damage in the file everything else descends from.
What print repair cannot do
• It cannot supply a motif that appears nowhere in the image, because the style of the other motifs is not evidence for the shape of the missing one.
• It cannot establish the position in the cycle when the crop does not contain enough repeats to show the cycle.
• It cannot preserve a color role that is absent from the area it samples, and its most likely answer is to merge that role into a neighbor.
• It cannot produce artwork, since a repaired photograph is an image of a print rather than a file that can be tiled, graded or separated.
There is also a limit that belongs to the fabric rather than the tool. Where a print sits over a seam, a dart or a gathered area, the pattern is distorted by the garment’s construction, and repairing that region flat replaces a real three-dimensional behavior with a two-dimensional guess. The result looks tidier and describes a garment that does not exist.
Reviewing a repair: tile it before you trust it
Review at three scales, in this order, and skip none of them.
Start at the garment. Open the repaired image at the size the product page uses and look for a change in density, spacing or rhythm anywhere near the repair — not at the repair, near it. Phase errors show up as a region that feels busier or emptier than the rest.
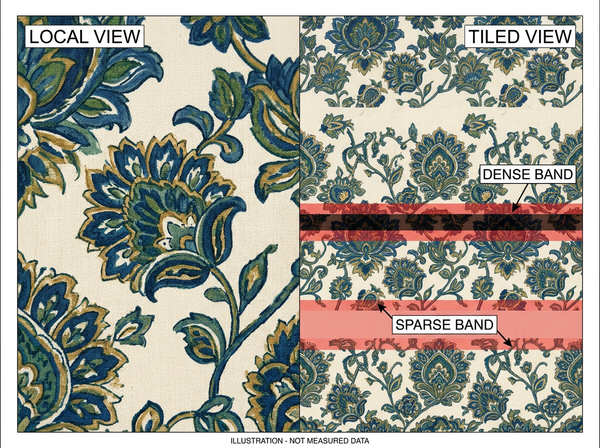
Then tile it, when the repair is to artwork rather than to a photograph. Lay the repeat out across an area several cycles wide and look at the field. Errors that are invisible in one repeat form bands and clusters across many, and this is the check that catches what the other two miss.
Then run the colorways. Remap the palette and look at the repaired area specifically, because that is where a merged role separates or fails to. If the region behaves differently from the rest of the print under a palette change, a role was lost in the repair regardless of how it looked in the original colors.
Common questions
The repair looks perfect at full size. Why tile it?
Full size shows one instance of the pattern, and phase and spacing errors are relationships between instances. Tiling is the only view where those relationships are visible at once. It takes a minute and it is where most bad repairs are caught.
How much of the print does the image need to contain?
Enough that several full repeats are visible around the damaged area, since that is what makes the cycle inferable rather than guessable. A crop holding part of a single repeat gives a tool texture information and nothing about structure. Where the shot is that tight, repair the artwork instead or shoot a wider frame.
Can we repair a print on a garment we no longer have?
You can, and the result should be labeled as a reconstruction rather than a record of the original. Keep the damaged file alongside it so a later viewer can tell which is which. Where the reconstruction feeds a reissue or a new colorway, have someone who knows the original look at it before it goes into production.
What about prints across seams and gathers?
Treat those regions as photography rather than repair, because the distortion is information about how the garment is built. Repairing them flat produces a version of the garment where the print behaves as it would on a table. If the seam area matters to the buyer, it needs a frame that shows it honestly.
Does a repaired photo give us a usable print file?
It does not. A print file is a tileable artwork with separable colors and a defined repeat, and an image of a printed garment is none of those things. Where the file is genuinely lost, rebuilding artwork from a photograph is a redraw job with its own review, not an export.
Who should sign off on a print repair?
Whoever owns the artwork, rather than whoever owns the image. Print decisions carry across colorways, size runs and future seasons, and an image owner reviewing an image will approve a repair that the artwork owner would reject on sight. Where those are the same person, the tiled view is what makes the second judgment possible.
What a patch is claiming
A repaired print states that the pattern continued in a particular way through the damaged area. Where several full repeats surround the damage, that statement rests on the structure of the print itself and the repair is reconstruction. Where the damage swallowed a motif or the crop was too tight to show the cycle, the statement rests on style alone, and style is a resemblance rather than a fact. Both look the same at the patch. Only one of them survives being tiled, recolored and put on a body, which is the reason to run those views before the file moves on.
Tile your last print repair
Find the most recent print you repaired and lay the repeat out across an area wide enough to show several cycles. Look for banding, crowding or a region that reads busier than the rest, then remap the palette and check whether the repaired area holds its edges. If either view shows something the crop did not, that file is worth redoing from the source artwork before it reaches a size run.
→ Print repair: https://www.style3d.ai/image-editing-tools/ai-print-repair
Written by