How to Create Virtual Bag Try-Ons with AI?
Learn how to visualize handbags, totes, and cross-body bags on models with AI. This guide covers the whole workflow.

Introduction: What is Virtual Bag Try-On?
Bags look flat on white backgrounds. Customers need to see how a bag hangs on a body, how it proportions against an outfit, and how it styles in a real scene. Arranging model shoots for every new SKU is expensive and slow, especially for small brands and accessories teams that may not have the budget for a full studio day every time a new design arrives.
Virtual Bag Try-On changes that workflow. Upload a bag product photo, choose how you want the model to appear — through demographic tags or a reference image — and Style3D AI places the bag onto a model with natural positioning and realistic scale. You get a product-ready styled image in seconds without booking models or organizing a physical shoot.
Quick Start Guide
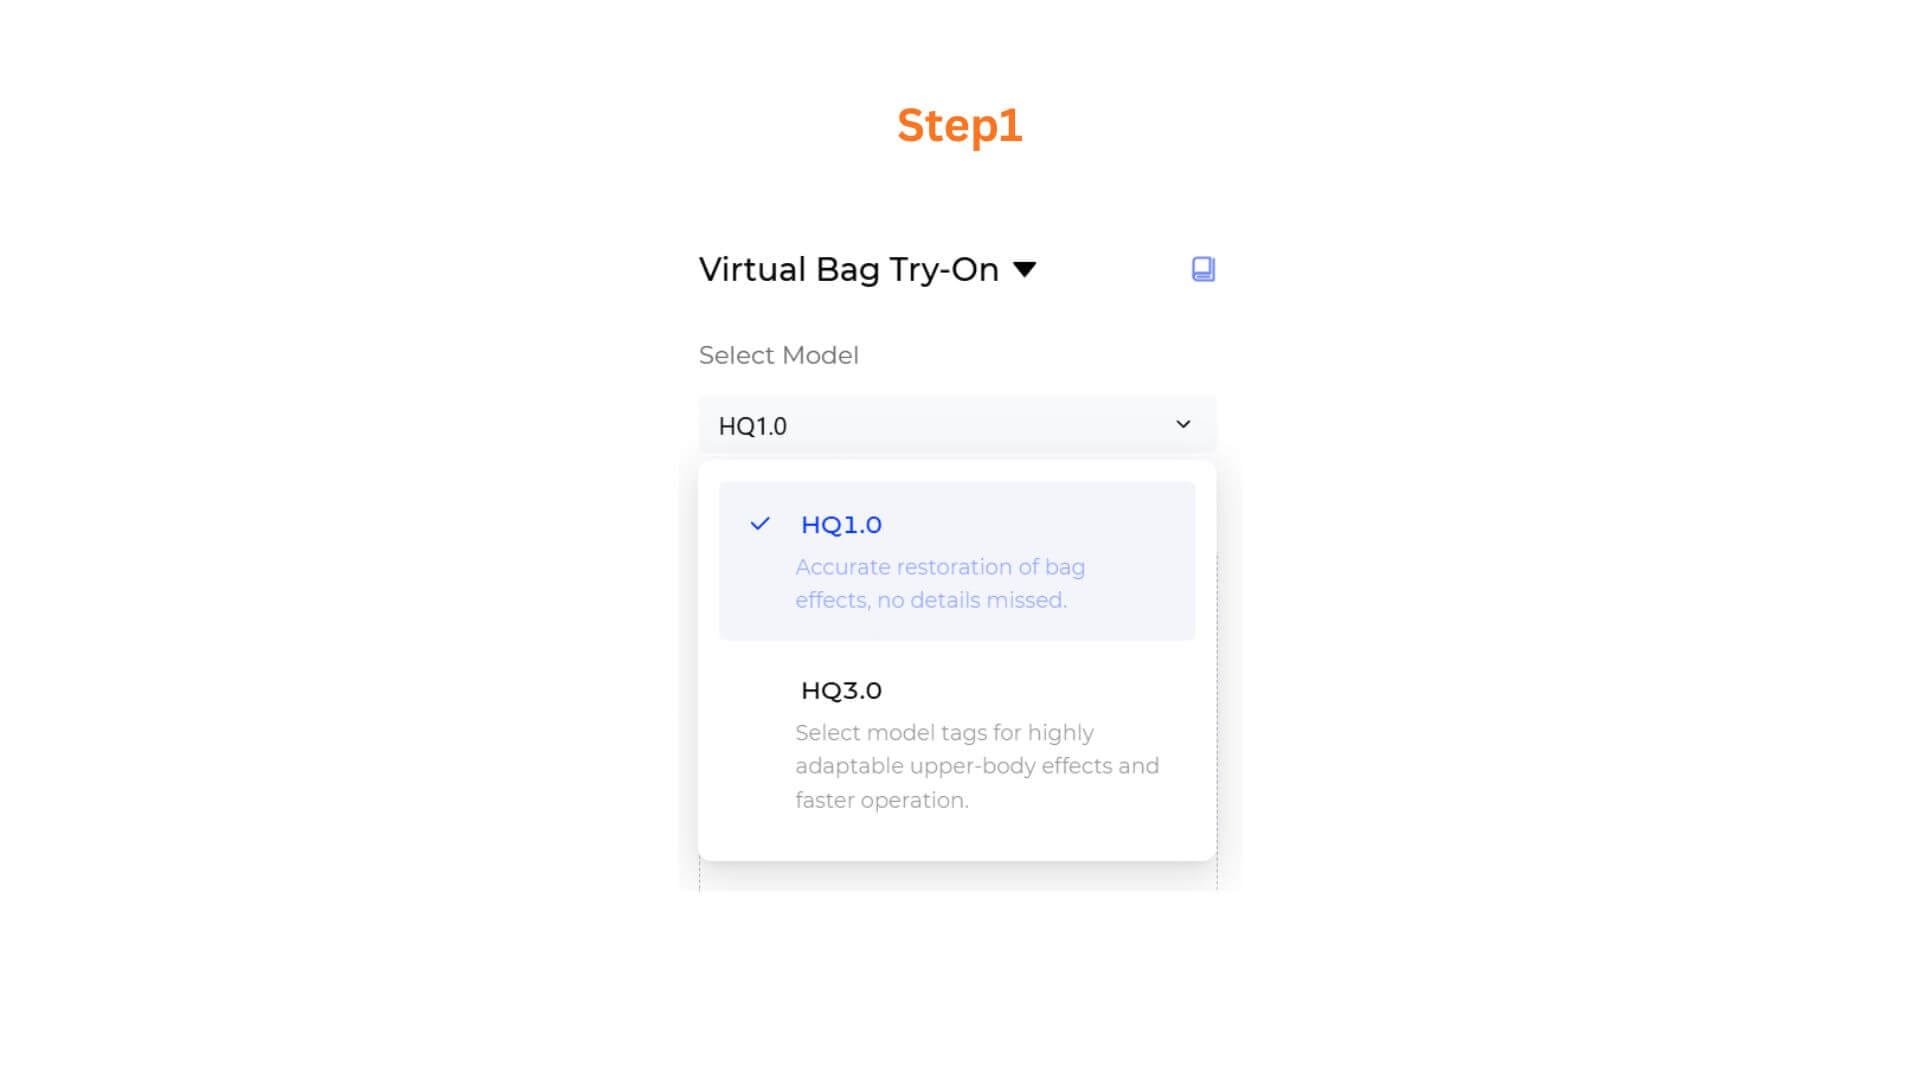
Step 1: Select the AI Model
At the top of the workspace, open the Select Model dropdown and choose HQ3.0 or HQ1.0
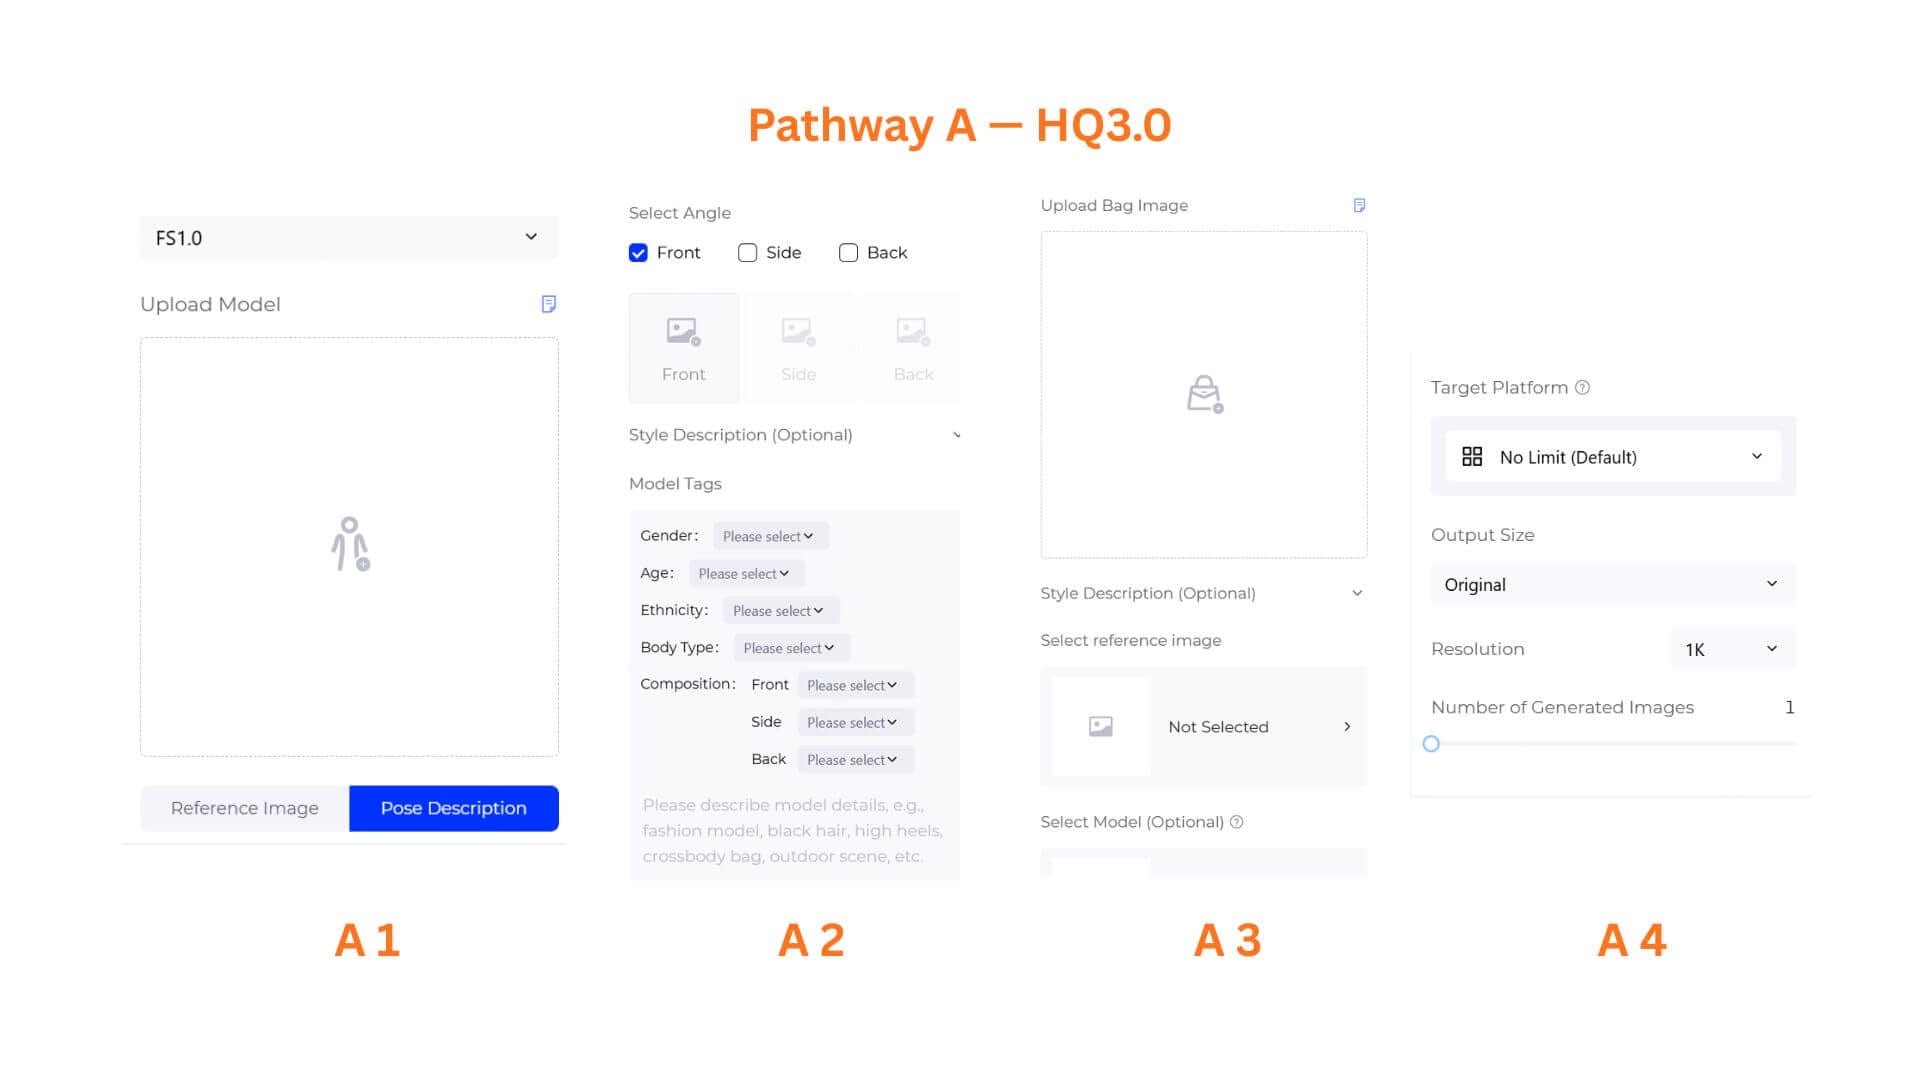
Pathway A — HQ3.0
HQ3.0 is the higher-quality model. It supports two input tabs: Model Tags and Reference Image.
A1. Choose an Input Tab
Two tabs appear below the upload area. Pick the one that matches your workflow.
- Model Tags — Describe the model with tags (gender, age, ethnicity, body type, etc.).
- Reference Image — Pick a model pose from the Style3D reference library.
A2. Model Tags Mode
- Select Angle — Choose which angles to generate: Front, Side, and/or Back.
- Style Description (Optional)s — Expand this section and enter any styling direction.
- Model Tags — Set the model attributes:
- Gender
- Age
- Ethnicity
- Body Type
- Composition — Separate dropdowns for Front, Side, and Back views. Each lets you choose a composition style.
Enter any additional details in the text box below the tags, for example: "Please describe model details, e.g., fashion model, black hair, high heels, crossbody bag, outdoor scene, etc."
A3. Reference Image Mode
- Upload Bag ImageClick the Upload Bag Image area and select a clean product photo of your bag. A front-facing or slightly angled shot against a simple background produces the cleanest integration.
- Style Description (Optional) — Expand this section and enter any styling direction.
- Click Select reference image area (currently showing Not Selected). Pick the pose you want.
- (Optional) Click Select Model (Optional) area to choose a specific face/model identity.
A4. Configure Output Settings
Scroll to the bottom and set the final options:
- Target Platform(Under HQ3.0 Model Tags Mode) — Choose No Limit (Default) or a platform preset such as Amazon, Shopify, TikTok, or Instagram.
- Output Size — Default is Original.
- Resolution — Choose your preferred resolution
- Number of Generated Images — Use the slider to set how many variations to generate.
Pathway B — HQ1.0
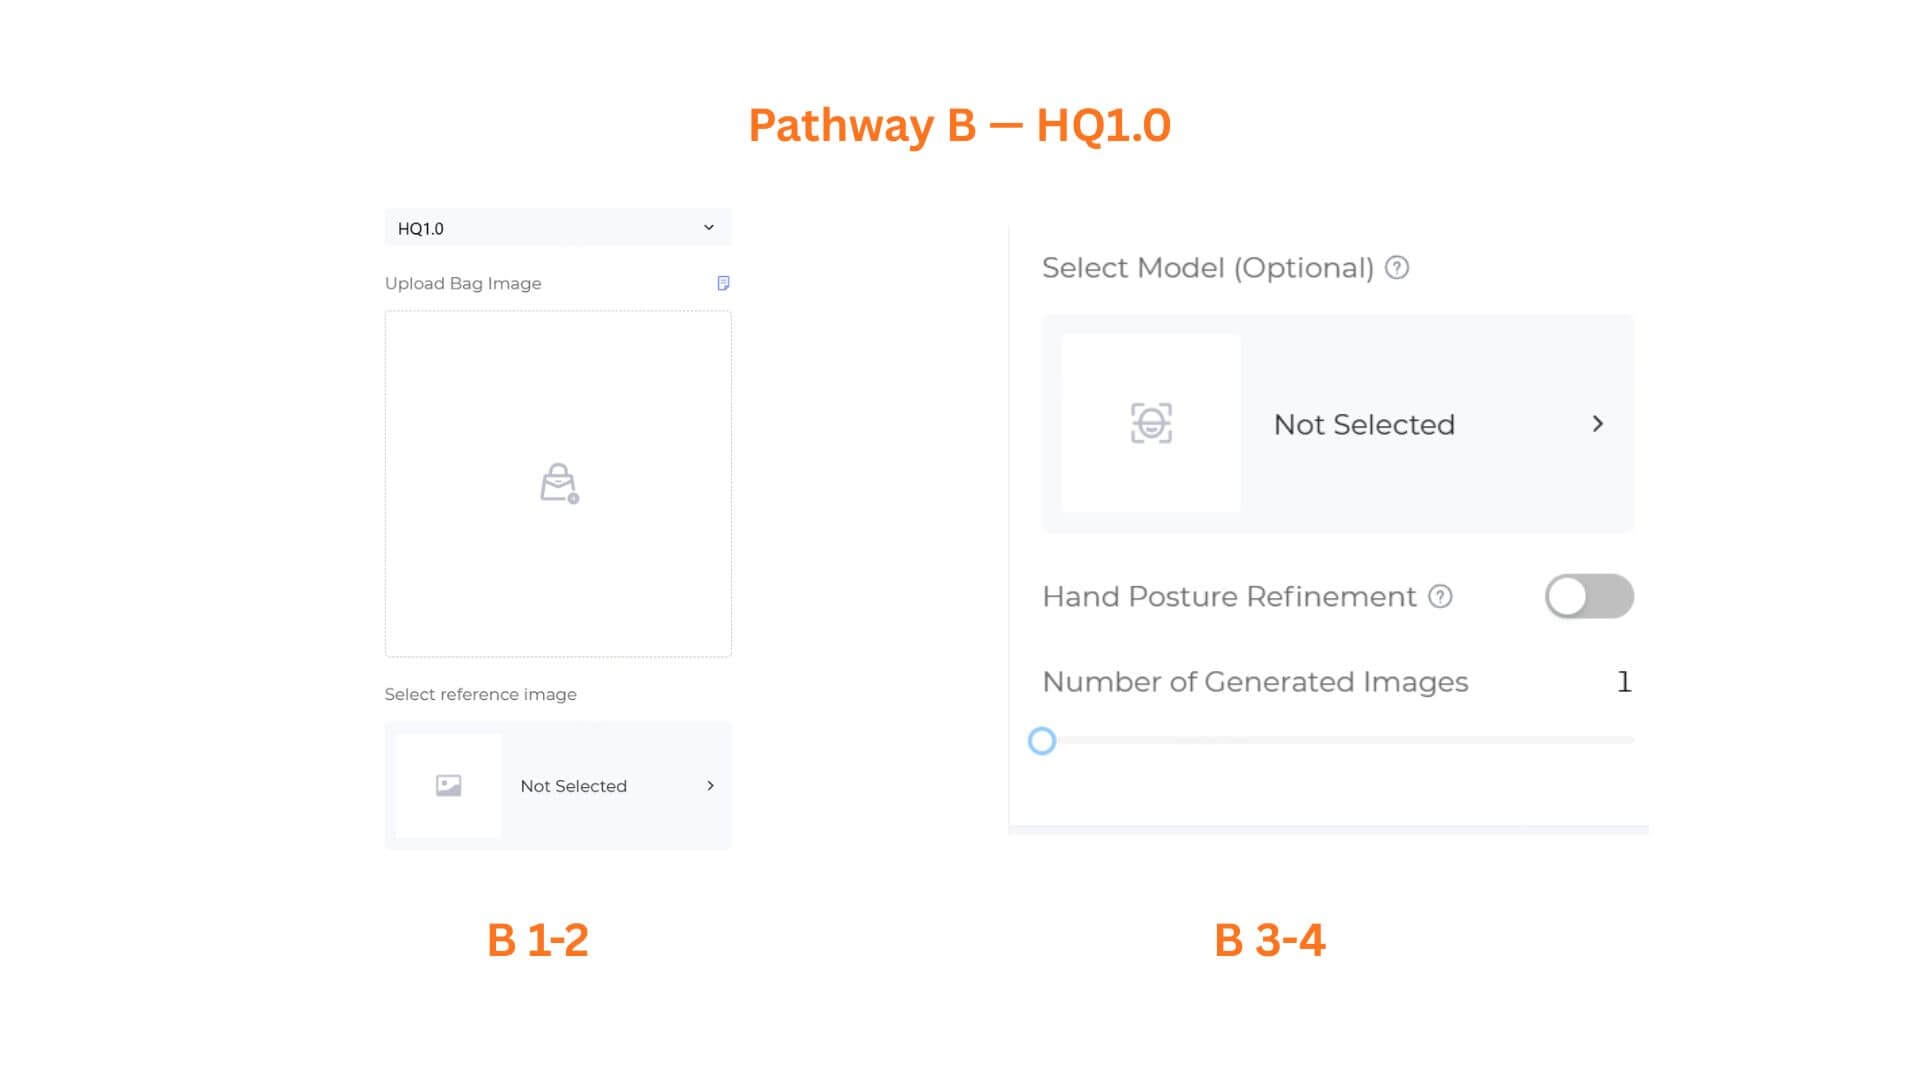
HQ1.0 is optimized for fast, reference-image-based bag try-ons.
B1. Upload Your Bag Image
Click the Upload Bag Image area and select your bag product photo.
B2. Select a Reference Image
Click Select reference image area and choose a pose.
B3. Select a Model (Optional)
Click Select Model (Optional) area to choose a model.
B4. Configure Output Settings
- Hand Posture Refinement — Toggle this ON if you want the AI to refine hand and finger placement around the bag.
- Number of Generated Images — Use the slider to set how many variations to generate.
Step 2: Generate Your Bag Try-On
Click Generate Now.
Pro-Tips
- Match the bag angle to the pose. Upload a bag photo taken from the same rough angle as the model's shoulder or arm in the chosen pose for the most natural alignment.
- Use Model Tags for consistent faces. If you need the same model identity across multiple bag shots, use Model Tags in HQ3.0 and select the same attributes.
- Use Reference Image for proven poses. When the reference library has a pose that already works for your bag style, use it for faster, more predictable results.
- Use Hand Posture Refinement for hand-held bags. In HQ1.0, this toggle helps fingers and handles look more natural.
- Combine with Outfit Try-On. For a complete styled look, generate the outfit first in Outfit Try-On and the bag separately, then composite or use the bag result as needed.
Frequently Asked Questions
Q: What bag types work best?
A: Handbags, totes, backpacks, clutches, cross-body bags, and shoulder bags all work. Very small accessories such as wallets or cardholders may appear disproportionately small — test and adjust.
Q: Does the AI position the bag automatically?
A: Yes. The AI analyzes the model's pose and places the bag in the most natural position. The result depends on the bag shape, model pose, and bag photo angle.
Q: Do I have to select a model?
A: No. Select Model (Optional) is optional. If you skip it, the AI uses the model from the reference image.
Written by
What's Next?