How to Photograph Clothing on a Mannequin: The Four Decisions
Four decisions are made before the shutter opens, and all four change how the garment reads. What each one does and where compensation becomes alteration.
Retouching is the second edit. The first one happens before the shutter opens.
Four decisions get made while the garment is being put on the form, and every one of them changes how the garment reads in the final image. They are usually taught as technique. They are closer to claims — each one says something about the garment that the garment did not say by itself.
The image is edited at capture
A form is not a body, and a garment on one does not sit the way it will on a person. Somebody has to close that gap manually before anything is photographed, and closing it involves pins, filling, and support.
None of this is improper. A garment photographed with no intervention at all reads as slack and badly made, which is its own misrepresentation. The intervention is necessary; the question is how much of it is compensating for the form and how much is improving the garment.
That distinction is the subject of this article, and it has a testable answer that arrives further down.
Decision one: the pins
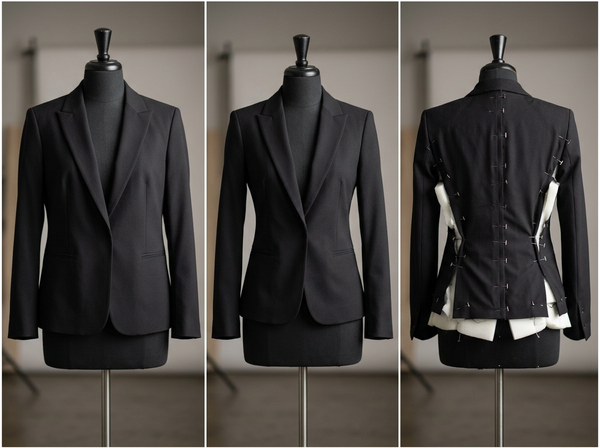
Pins go at the back, where the camera cannot see them, and they do one of two things.
They can draw in excess fabric that exists because the form is narrower than the garment — compensation for a mismatch between the object and the stand.
Or they can draw in excess fabric that exists because the garment is cut generously — which is a property of the garment that a customer is going to encounter.
The same pin, in the same place, doing visually identical work. What separates them is which of the two situations produced the excess, and the person pinning is often the only one who knows.
Pinning also has a secondary effect people underestimate: it changes where the garment hangs from. Pulling fabric to the center back raises the front hem slightly and tightens the shoulder, which shifts the whole silhouette upward. A garment pinned enthusiastically photographs as a shorter, more fitted version of itself.
That secondary effect is why pinning tends to escalate within a single shoot. A garment is pinned to remove a wrinkle, the pinning tightens the shoulder, the tightened shoulder creates a new wrinkle somewhere else, and that gets pinned too. Nobody made a decision to shape the garment heavily; each pin was a response to the previous one. Stepping back and unpinning entirely before restarting is faster than it feels, and it is the only way to see where the escalation began.
Decision two: the neckline
Collars and necklines have to be supported, because a form has a neck and a garment on it wants to collapse around it.
How far the opening is propped open determines what the customer sees. Propped generously, a collar stands taller, the opening reads wider, and the neckline appears to have a shape the pattern did not give it. Propped minimally, the same collar folds and the garment looks unfinished.
The correct amount is whatever the garment does when worn, which is a question about the garment rather than about the shot — and which requires somebody to have seen it worn. Where that has not happened, the neckline gets propped to whatever looks best, and looking best is reliably a little more open than reality.
Decision three: the fill
Sleeves and bodies get filled to give volume, and the amount of filling is the least-discussed variable with the largest effect.
Over-fill and the garment reads as more substantial than it is — a light jacket photographs as a heavier one, a thin knit appears to have body. Under-fill and it reads as limp and cheap.
The two merged terms behind this topic sit at opposite ends of this scale. A wedding gown needs extensive support and filling, because its shape is largely structural and a form supplies almost none of that structure. A hoodie needs very little, and applying gown-level shaping to one produces a stiff, upholstered object that no customer will recognize when it arrives.
The amount of fill is a category fact, not a styling preference, and getting it wrong misrepresents fabric weight — which is one of the properties customers are least able to verify before purchase and most likely to notice after.
Decision four: the light
Light position determines what is visible, and the purpose here is to make construction legible rather than to produce an even surface — an image exists to carry evidence, and evidence that has been lit flat is not evidence.
What is worth adding is how light interacts with the previous three decisions. Side light exaggerates volume, so an over-filled garment lit from the side reads heavier still. Pins that pull fabric to the center back create tension lines that side light will find. A propped neckline casts a shadow whose depth reveals how far it was propped.
Which means the four decisions are not independent. A shaping choice that looks acceptable under flat light can become obvious under directional light, and the reasonable response is to fix the shaping rather than to flatten the light.
How much shaping is honest
Here is the rule, and it is checkable rather than a matter of taste.
If the same adjustment would still be needed on a correctly sized form, it is compensation. If it is only needed on this form, it is alteration.
A garment pinned because the form is a size smaller than the sample is being altered — it is being made to fit something it does not fit, and the customer will receive the version that does not. A garment pinned because a form has no waist and a person does is being compensated, and the customer will receive something that behaves as the image suggests.
The rule works because it isolates the variable. It does not require anyone to judge how much pinning is too much, which is unanswerable. It asks a factual question with a yes or no answer.
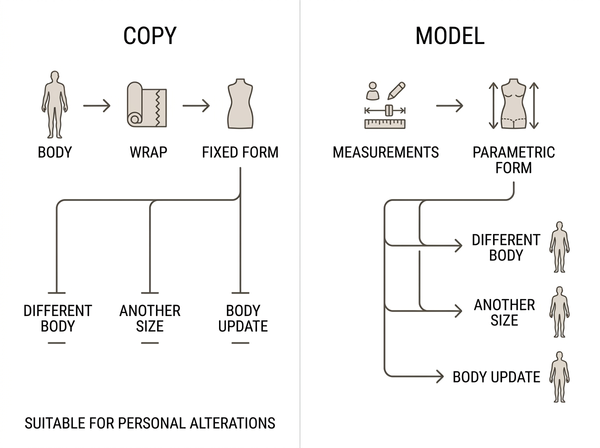
Applying it requires knowing what a correctly sized form would do, which means the form has to correspond to the sample size in the first place. Where it does not, every shot is alteration by default, and no amount of restraint at the styling stage recovers it — appearance can be settled without fit being settled, and a shot pinned onto the wrong form is settling appearance against a fit that does not exist.
Writing it down so the range matches
The four decisions are made by a person, garment by garment, and unrecorded decisions drift.
A shaping specification per category solves it: how much fill for this garment type, how far necklines are propped, whether pinning is permitted and for what. Written down, it survives a change of stylist and produces a range where every style was shaped the same way — and a set of images is judged as a set, so consistent shaping matters more than optimal shaping.
The specification does not need to be long. Four lines per category, one per decision, is enough to remove the variance that matters.
It also changes who can do the work. Shaping is currently held as craft knowledge, which means a range shot by a different stylist looks different in ways nobody can articulate. Written down, the four decisions become instructions someone can follow on their first day, and the craft knowledge moves to where it belongs — deciding what the specification should say, rather than re-deciding it garment by garment under time pressure.
FAQ
How many pins is too many?
Counting is the wrong test, since one pin in the wrong place alters more than several placed to compensate for a form’s shape. The question to ask of each is whether it would still be needed on a correctly sized form.
Can filling be avoided entirely?
For structured garments that hold their own shape, largely yes. For anything soft or lightweight, no filling produces an image that misrepresents the garment in the opposite direction, reading as limp when it is not.
What if we only have one form for a whole range?
Then some styles are being shot on a form that does not correspond to them, and shaping is compensating for a size mismatch rather than a body mismatch. The images are still usable; they are less reliable about fit, and worth knowing that about.
Should we photograph the back of the pinned garment for reference?
It is a cheap habit with real value later, since it makes visible what was done and lets somebody assess whether a shot was compensated or altered. It also settles disputes about whether a garment ran large.
Does this apply to ghost mannequin images too?
Fully. A ghost mannequin image starts as a mannequin image, so every shaping decision described here is present in it, with the form edited out afterward.
Who should own the shaping specification?
Whoever is accountable for the images representing the garments accurately, which is usually the same function that signs off on product copy. Leaving it with the photographer places a judgment about the product with someone who has not seen it worn.
Where this leaves you
Look at your last mannequin image and ask what would be visible from behind.
Every image of this kind has something back there — pins, filling, support — and none of that is dishonest by itself. What determines whether the image is accurate is whether those interventions were closing the gap between a form and a body, or closing the gap between a garment and a fit it does not have. The difference is invisible in the photograph and obvious from the rule, which is why the rule is worth writing down before the next shoot rather than arguing about after it.
Photograph the back before you shoot the front
Make one addition to your mannequin workflow: a quick reference shot of the garment from behind, showing every pin and every piece of filling, kept alongside the final image. It costs seconds and it makes the first edit visible. Then apply one question to what you see — would this still be needed on a correctly sized form. Whatever fails that test is altering the garment rather than compensating for the stand. See how a consistent product image set gets built.
Written by