What Does It Mean to Upscale an Image?
Upscaling an image adds pixels nobody photographed. What fills them, why plausible isn’t recovered, and when to reshoot instead.
Upscaling an image means increasing its pixel dimensions — making it bigger in terms of the grid of pixels it is made of, so it can be printed larger or displayed at a bigger size without looking blocky.
The part that matters is what fills the new pixels. The original file does not contain them. Something has to decide what color each added pixel should be, and the whole difference between a useful upscale and a useless one comes down to how that decision is made and how honest the result is about being a guess.
Where the extra pixels come from
Traditional resampling works by averaging. To double an image’s dimensions, the software looks at the surrounding original pixels and calculates intermediate values between them. It is arithmetic, it is predictable, and it produces a larger version of the same information — which is why a heavily resampled photo looks soft. Nothing was added; the existing detail was simply spread over more pixels.
Learned upscaling works differently. A model trained on large numbers of image pairs — a small version and its full-size original — learns what kinds of detail typically accompany what kinds of low-resolution patterns. Given a blurry edge, it produces the sharp edge that usually sits behind such a blur.
There is a third approach worth naming because it sits between the two. Some methods add sharpening and local contrast without adding structure, which makes an image read as crisper at the same pixel count. That is not upscaling at all, and confusing the two leads teams to conclude that upscaling did nothing when what they applied was an enhancement pass.
That is a meaningful improvement and also the source of every problem in this article. The model is not recovering the detail that was in the original scene. It is producing detail that is statistically plausible given what it can see. Most of the time those coincide closely enough that nobody notices. Sometimes they do not.
Plausible is not the same as recovered
A photograph records what the sensor captured. Once detail falls below what the sensor resolved, it is gone from the file, and no process reads it back out.
What a learned upscaler produces in those areas is an informed invention. Text too small to read becomes text-shaped marks that look like letters. A face at a distance gains features. A woven fabric gains a weave. In each case the output looks more detailed and is less faithful, because the detail is generated rather than measured.
For most uses this trade is fine. A blog header, a background image, a social post — nobody is making a decision based on the invented detail, so plausibility is enough.
For a product image, the trade is different. A customer is deciding whether to buy based on what they can see, and the thing they are looking at closely is often exactly the thing that was invented.
The apparel-specific catch
Fabric is the worst case for this, because fabric is texture and texture is precisely what an upscaler synthesizes.
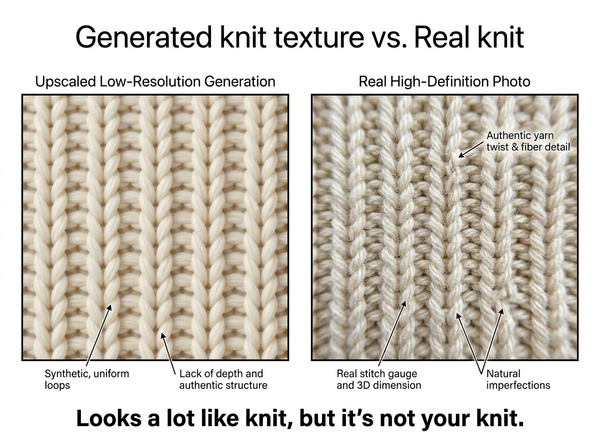
Upscale a low-resolution photo of a knit and the model will produce a knit texture. It will look convincing. It will not be your knit — not your gauge, not your yarn, not your stitch. A customer zooming into the product image is examining a fabric that does not exist, and the physical garment will differ in ways that are visible in the hand even if not obviously wrong on screen.
The same applies to prints and small type. A logo too small in the original becomes a logo-shaped thing with plausible letterforms, which is a problem when the letterforms belong to a brand. Care labels, woven marks and any small text should never be upscaled into legibility, because the result will read clearly and say something slightly other than what the label says.
Fine structures behave similarly. Lace, mesh, embroidery and fringe are rebuilt as generic versions of themselves. The output is a photograph of a garment adjacent to yours.
Whether that matters depends on what the customer is buying. For a plain cotton tee where the fabric is not the point, an invented weave is harmless. For a hand-knit, a jacquard, a lace piece or anything sold on its material, the fabric is the product, and an image showing a different one is a representation problem rather than a quality one — which is a different kind of risk and not one that gets caught by a reviewer asking whether the image looks good.
When upscaling helps and when it does not
Situation | Upscaling | Why |
Slightly undersized file, otherwise sharp | Works well | Little invention required |
Preparing an already-good image for large print | Works well | Detail exists; it is being redistributed |
Old catalog images below current platform minimums | Usually works | Judge the fabric areas specifically |
Screenshot or heavily compressed source | Poor | Compression artifacts get amplified into structure |
Fabric texture is the selling point | Avoid | The texture will be invented |
Small type, logos, care labels | Avoid | Legible output that may not be accurate |
Main product image on a listing | Reshoot instead | The zoom view is where invention shows |
Compressed sources deserve the extra warning in that table. Heavy JPEG compression leaves blocky artifacts and color banding, and a learned upscaler has no way to know those are damage rather than content, so it reconstructs them as structure. The result is a large, sharp image of the compression rather than of the garment, which is a distinctive look once you have seen it and hard to unsee afterwards.
The pattern is that upscaling redistributes well and invents badly. Where the original has the information and simply needs more pixels to hold it, results are good. Where the original never had the information, the output is a guess presented with the same confidence as a photograph.
Upscaling as a shortcut around platform minimums
Most marketplaces publish minimum image dimensions, and undersized files are the most common reason teams reach for an upscaler. It works, in the sense that the file will pass the check.
Whether it should is a separate question. Platform minimums exist because customers zoom, and zoom is exactly where invented texture becomes visible. Passing an automated dimension check with a file that falls apart at zoom solves the upload problem and creates the returns problem.
Where the image is a secondary angle, a lifestyle shot or a category tile, upscaling to clear a threshold is reasonable. Where it is the main image and the product is a textured garment, running the file through an upscaler buys you a listing that will be judged on invented detail, and a reshoot is the cheaper answer over a season.
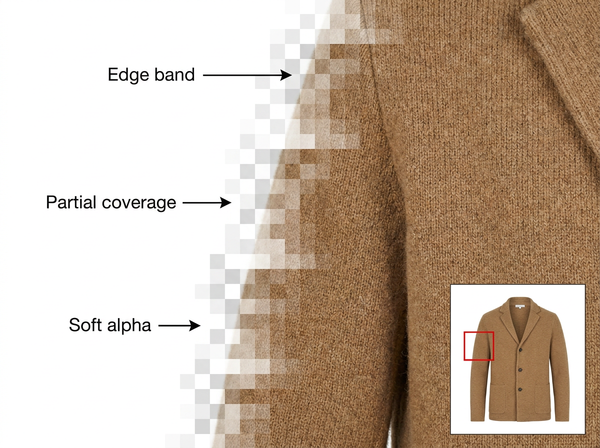
Cutouts deserve a specific note. Edge quality is judged at the pixel level, so upscaling a cutout enlarges whatever the edge already was — a soft alpha stays soft and usable, while a hard-edged mask becomes a larger hard edge with more visible steps. Getting the background removed cleanly at full resolution before any enlargement is the order that works.
How to judge an upscale
Compare at the size it will actually be used, not at fit-to-screen. An upscale that looks impressive shrunk to fit a monitor tells you nothing about how it holds at print size or in a zoom view.
Then look at the areas where invention concentrates: fabric surface, any text, hairlines, and the boundary between two similar tones. These are the places a model has the least information and produces the most confident output.
One habit makes this concrete. Keep the original open beside the upscale at the same display size and switch between them, rather than judging the upscale alone. Differences that are invisible when looking at one file are obvious when toggling between two, and the areas that change most are the areas with the most invention in them.
The useful question is not whether the result looks sharper. It will. The question is whether anything a customer will act on has been invented, and whether you would be comfortable if they compared it to the physical item side by side.
What upscaling cannot do
It cannot recover detail that was not captured. This is the fundamental limit, and it applies equally to every method regardless of how the output looks.
It cannot fix motion blur, focus errors or compression damage in a way that restores the original subject. It can produce a sharp image; the sharp image is a reconstruction, and where the original error was severe, the reconstruction departs from the subject.
It cannot make a small image accurate at a large size. Accuracy and apparent sharpness are different properties, and upscaling improves only the second.
It cannot substitute for shooting at the resolution you need. Where images will be printed large or zoomed closely, capture size is a shoot decision, and no post-production step reverses a decision to shoot small.
Frequently Asked Questions
Is upscaling the same as increasing DPI?
No, though the two get confused. Pixel dimensions are the actual information in the file; DPI is a tag describing how large those pixels should print. Changing the tag without adding pixels changes nothing about the image, while upscaling changes the pixel count itself.
Does upscaling reduce quality?
It does not reduce the original information, but it dilutes it — the same detail now spread across more pixels, plus whatever was generated to fill the gaps. The file looks larger and sharper while containing the same measured detail as before.
Can I upscale a photo repeatedly?
Technically yes, and results degrade in a specific way: each pass treats the previous pass’s inventions as real detail and builds on them. Two rounds of upscaling produce output further from the original subject than one larger round.
Will upscaling help a blurry photo?
It will produce a sharper-looking image, which is not the same as recovering the subject. For blur caused by movement or missed focus, the model is reconstructing what might have been there, and the further the original is from sharp, the more of the result is invention.
Is it acceptable to upscale product images?
For secondary and contextual images, generally yes. For main images of textured garments, treat it with caution, since the zoom view is precisely where synthesized fabric shows and precisely where a customer forms an expectation the physical item has to meet.
Should upscaling happen before or after other editing?
Generally last, after cutout, correction and retouching are done at the original resolution, since every earlier step works better with the real pixels rather than with generated ones. Upscaling first means each subsequent step is operating partly on invented detail and treating it as real.
How do I know if an upscale is good enough?
View it at final size and inspect the fabric, any text and the fine structures. If those areas look convincing but you cannot verify them against the actual garment, the upscale is convincing rather than accurate, and that distinction is what should drive the decision.
Sharper and truer are different goals
Upscaling answers a real problem — files smaller than the use requires — and it answers it by adding pixels that no one photographed. Where the original holds the information, that is redistribution and the result is trustworthy. Where it does not, the output is a plausible fiction rendered at high resolution, and it is most convincing exactly where it is least reliable. Judge by whether a customer’s decision rests on the invented part, and reshoot when it does.
Check the fabric before you trust the file
Upscale one image, open it at the size it will actually be viewed, and zoom into the fabric surface, any printed text and any fine structure like lace or embroidery. Compare those areas against the physical garment. If the texture reads convincingly but you cannot confirm it matches the real thing, treat the file as suitable for secondary images and reshoot the main one.
→ Image Upscaler — Style3D AI
Written by